D2X | Modern C++ Core Language Features - "A C++ tutorial project focused on practical"
Goals
[Master]- Core language features of Modern C++ and their usage scenarios[Master]- The ability to identify and debug issues using compiler error messages[Familiarize]- The ability to solve unfamiliar C++ problems using documentation and cppreference[Understand]- How to participate in the technical community — using open-source projects, asking questions, joining discussions, or contributing
Quick Start
Try
Code -> Book -> Video -> X -> Code
Interactive Code Practice (Online)
click the button below to automatically complete the configuration in the cloud and enter the practice code detection mode
![]()
Interactive Code Practice (Local)
click to view xlings installation command
Linux/MacOS
curl -fsSL https://raw.githubusercontent.com/openxlings/xlings/main/tools/other/quick_install.sh | bash
Windows - PowerShell
irm https://raw.githubusercontent.com/openxlings/xlings/main/tools/other/quick_install.ps1 | iex
tips: xlings -> details
xlings install d2x -y
d2x install d2mcpp
cd d2mcpp
d2x checker
Community
- groups: mcpp forum
- forum: issues feedback, practice code, technical discussions
- community activities: 📣 MSCP - mcpp project learning and contributor training program
Note: Complex issues (technical, environment setup, etc.) are recommended to be posted on the forum and detailed description of the problem can be more effective in problem solving and reuse.
Contributing
- Community Communication: Report issues, participate in community discussions, and help new users solve problems.
- Project Maintenance and Development: Participate in community issue resolution, bug fixes, multilingual support, join the MSCP activity group, and develop and optimize new features and modules.
📑License & CLA
- This project welcomes free use and distribution! You may use, modify, and share the code and documentation in this project free under the Apache License 2.0 and CC-BY-NC-SA 4.0 licenses.
- If you would like to contribute code or documentation, please read the Contributor License Agreement (CLA) first.
👥Contributors

Preface
d2mcpp is an open-source tutorial project focused on Modern C++ Core Language Features with an emphasis on hands-on coding practice. The project structure follows the [Book + Video + Code + X] model, providing users with online e-books, corresponding instructional videos, accompanying practice code, as well as discussion forums and regular learning activities.
Language Support
Activities | 📣 MSCP - mcpp Project Learning and Contributor Cultivation Program
MSCP is a "Earth Online" style role-playing game developed based on the d2mcpp open-source project. In the game, you'll play as a "programming beginner" embarking on a challenging and exciting journey to learn Modern C++ and uncover its underlying truths...
Price:FreeDeveloper:SunrisepeakPublisher:MOGARelease Date:October 2025Game Duration:100H - 200HTags:Souls-like, The Sims, 🌍Online, Programmer, C++, Open Source, Feynman Learning Method- -> Game Details
Usage Guide
d2mcpp is a hands-on tutorial project focused on Modern C++ core language features. Based on the xlings(d2x) tool, it implements a compiler-driven development model for code practice that can automatically detect exercise code status and navigate to the next exercise.
0. xlings Tool Installation
xlings contains the tools required for the tutorial project - More tool details
Linux
curl -fsSL https://raw.githubusercontent.com/openxlings/xlings/main/tools/other/quick_install.sh | bash
or
wget https://raw.githubusercontent.com/openxlings/xlings/main/tools/other/quick_install.sh -O - | bash
Windows - PowerShell
Invoke-Expression (Invoke-Webrequest 'https://raw.githubusercontent.com/openxlings/xlings/main/tools/other/quick_install.ps1' -UseBasicParsing).Content
1. Get Project and Auto-configure Environment
Download the project to current directory and automatically configure local environment
d2x install d2mcpp
Local E-book
Execute
d2x bookcommand in the project directory to open local documentation (includes usage guide and e-book)
d2x book
Practice Code Auto-detection
Enter the project directory
d2mcppand run the checker command to enter the practice code auto-detection program
d2x checker
Specify Exercise for Detection
d2x checker [name]
Note: Exercise names support fuzzy matching
Sync Latest Practice Code
Since the project is continuously updated, you can use the following command for automatic synchronization (if synchronization fails, you may need to manually update the project code using git)
d2x update
2. Automated Detection Program Introduction
After entering the automated code practice environment using d2x checker, the tool will automatically locate and open the corresponding practice code file, and output compiler errors and hints in the console. The detection program generally has two detection phases: the first is compile-time detection, where you need to fix compilation errors based on hints in the practice code and compiler error messages in the console; the second is runtime detection, which checks if the current code passes all checkpoints when running. When compilation errors are fixed and all checkpoints are passed, the console will display that the current exercise is completed and prompt you to proceed to the next exercise.
Practice Code File Example
// d2mcpp: https://github.com/mcpp-community/d2mcpp
// license: Apache-2.0
// file: dslings/hello-mcpp.cpp
//
// Exercise: Automated Code Practice Tutorial
//
// Tips:
//    This project uses the xlings tool to build automated code practice projects. Execute
//    d2x checker in the project root directory to enter "compiler-driven development mode"
//    for automatic exercise code detection.
//    You need to modify errors in the code based on console error messages and hints.
//    When all compilation errors and runtime checkpoints are fixed, you can delete or comment
//    out the D2X_WAIT macro in the code to automatically proceed to the next exercise.
//
//      - D2X_WAIT: This macro isolates different exercises. You can delete or comment it out to proceed to the next exercise.
//      - d2x_assert_eq: This macro is used for runtime checkpoints. You need to fix code errors so that all
//      - D2X_YOUR_ANSWER: This macro indicates code that needs modification, typically used for code completion (replace this macro with correct code)
//
// Auto-Checker Command:
//
//   d2x checker hello-mcpp
//

#include <d2x/cpp/common.hpp>

// You can observe "real-time" changes in the console when modifying code

int main() {

    std::cout << "hello, mcpp!" << std:endl; // 0. Fix this compilation error

    int a = 1.1; // 1. Fix this runtime error, change int to double to pass the check

    d2x_assert_eq(a, 1.1); // 2. Runtime checkpoint, need to fix code to pass all checkpoints (cannot directly delete checkpoint code)

    D2X_YOUR_ANSWER b = a; // 3. Fix this compilation error, give b an appropriate type

    d2x_assert_eq(b, 1); // 4. Runtime checkpoint 2

    D2X_WAIT // 5. Delete or comment out this macro to proceed to the next exercise (project formal code practice)

    return 0;
}
Console Output and Explanation
🌏Progress: [>----------] 0/10 -->> Shows current exercise progress

[Target: 00-0-hello-mcpp] - normal -->> Current exercise name

❌ Error: Compilation/Running failed for dslings/hello-mcpp.cpp -->> Shows detection status

 The code exist some error!

---------C-Output--------- - Compiler output information
[HONLY LOGW]: main: dslings/hello-mcpp.cpp:24 - ❌ | a == 1.1 (1 == 1.100000) -->> Error hint and location (line 24)
[HONLY LOGW]: main: dslings/hello-mcpp.cpp:26 - 🥳 Delete the D2X_WAIT to continue...


AI-Tips-Config: https://xlings.d2learn.org/en/documents/d2x/intro.html -->> AI hints (requires configuring large model key, optional)

---------E-Files---------
dslings/hello-mcpp.cpp -->> Current detected file
-------------------------

Homepage: https://github.com/openxlings/xlings
3. Configure Project (Optional)
Configure Language
Edit the lang attribute in the project configuration file .d2x.json. zh corresponds to Chinese, and en corresponds to English.
{
    "version": "0.1.1",
    "buildtools": "xmake d2x-buildtools",
    "lang": "en",
    ...
}
Custom Editor - Using nvim as Example
If you prefer to use Neovim as your editor with LSP (clangd) support, you can configure it as follows:
1. Edit the editor attribute in the project configuration file config.xlings and set it to nvim (or zed)
d2x = {
    checker = {
        name = "dslings",
        editor = "nvim", -- option: vscode, nvim, zed
    },
2. Run the one-click dependency installation and environment configuration command in the project root directory
xlings install
3. In the project directory, rerun the detection command d2x checker to open the corresponding exercise file with Neovim, which will support automatic exercise navigation/switching
Note: In Neovim, the "real-time detection feature" is triggered by the
:wcommand. That is, after modifying the code, saving the file in Neovim's command-line mode (:w) will promptd2xto update the detection results.
4. Resources and Communication
Communication Group (Q): 167535744
Tutorial Discussion Section: https://forum.d2learn.org/category/20
xlings: https://github.com/openxlings/xlings
Tutorial Repository: https://github.com/mcpp-community/d2mcpp
Tutorial Video Collection: https://space.bilibili.com/65858958/lists/5208246
Type Deduction - auto and decltype
auto and decltype are powerful type deduction tools introduced in C++11. They not only make code more concise but also enhance the expressive power of templates and generics.
| Book | Video | Code | X |
|---|---|---|---|
| cppreference-auto / cppreference-decltype / markdown | Video Explanation / Exercise Walkthrough | Practice Code |
Why were they introduced?
- Solve the problem of overly complex type declarations
- Need to obtain object or expression types in template applications
- Support lambda expression definitions
What's the difference between auto and decltype?
- auto is often used for variable definitions, and the deduced type may lose const or reference (can be explicitly specified with auto &)
- decltype obtains the exact type of an expression
- auto generally cannot be used as a template type parameter
I. Basic Usage and Scenarios
Declaration and Definition
Acts as a type placeholder to assist in variable definition or declaration. When using auto, the variable must be initialized, while decltype can be used without initialization.
int b = 2;
auto b1 = b;
decltype(b) b2 = b;
decltype(b) b3; // Can be used without initialization
Expression Type Deduction
Often used for complex expression type deduction to ensure calculation precision
int a = 1;

auto b1 = a + 2;
decltype(a + 2 + 1.1) b2 = a + 2 + 1.1;

auto c1 = a + '0';
decltype(2 + 'a') c2 = 2 + 'a';
Complex Type Deduction
Iterator Type Deduction
std::vector<int> v = {1, 2, 3};

// std::vector<int>::iterator it = v.begin();
auto it = v.begin(); // Automatically deduce iterator type
// decltype(v.begin()) it = v.begin();
for (; it != v.end(); ++it) {
    if (*it == 2) {
        v.insert(it, 0);
        break;
    }
}
Function Type Deduction
For complex types like functions or lambda expressions, auto and decltype are commonly used. Generally, lambda definitions use auto, while template type parameters use decltype.
int add_func(int a, int b) {
    return a + b;
}

int main() {
    auto minus_func = [](int a, int b) { return a - b; };

    std::vector<std::function<decltype(add_func)>> funcVec = {
        add_func,
        minus_func
    };

    funcVec[0](1, 2);
    funcVec[1](1, 2);
    //...
}
Function Return Type Deduction
Syntax Sugar Usage
auto supports trailing return type function definitions and can be used with decltype for return type deduction.
auto main() -> int {
    return 0;
}

auto add(int a, double b) -> decltype(a + b) {
    return a + b;
}
Function Template Return Type Deduction
When the template return type cannot be determined, auto + decltype can be used for deduction, allowing add to support general types like int, double,... and complex types like Point, Vec,... enhancing generic programming expressiveness. (In C++14, decltype can be omitted)
template<typename T1, typename T2>
auto add(T1 a, T2 b) -> decltype(a + b) {
    return a + b;
}
Class/Structure Member Type Deduction
struct Object {
    const int a;
    double b;
    Object() : a(1), b(2.0) { }
};

int main() {
    const Object obj;

    auto a = obj.a;
    std::vector<decltype(obj.b)> vec;
}
II. Real-World Case - auto/decltype in the STL
The examples above illustrate syntax; the practical value of auto/decltype is demonstrated most directly in the standard library's own implementation. The following picks two common pieces of code from the in-repo MSVC STL to demonstrate
autoanddecltyperespectively;_STDand the like are internal library macros and qualifiers — focus on theauto/decltypewhen reading.
auto deduces iterator and element types: traversing a container
Traversing a container is the most common scenario for auto. Below is a traversal from path normalization in <filesystem>: auto _Pos deduces the iterator type, and const auto _Elem deduces the element type obtained by dereferencing — the very same form as auto it = v.begin() from "Complex type deduction - iterators" in ## I.
// MSVC STL · msvc-stl/stl/inc/filesystem (abridged, original indentation kept)
            auto _New_end = _Vec.begin();
            for (auto _Pos = _Vec.begin(); _Pos != _Vec.end();) {
                const auto _Elem = *_Pos++;
                // ...(decide whether to write _Elem back to _New_end; omitted)
            }
_Vec is the container of path components; both its iterator type and its element type are left to auto, with no need to spell out the concrete types.
decltype takes the type of a variable: the binary search in std::lower_bound
The most direct use of decltype is "take the type of a variable or expression". In the standard library's binary search std::lower_bound, auto first deduces the range length _Count, then decltype(_Count) denotes "the same type as _Count" to convert _Count / 2 back to that type:
// MSVC STL · msvc-stl/stl/inc/xutility (abridged) —— std::lower_bound
    auto _UFirst = _STD _Get_unwrapped(_First);
    auto _Count  = _STD distance(_UFirst, _STD _Get_unwrapped(_Last));

    while (0 < _Count) { // divide and conquer, find half that contains answer
        const auto _Count2 = static_cast<decltype(_Count)>(_Count / 2);
        const auto _UMid   = _STD next(_UFirst, _Count2);
        // ...(compare at _UMid, narrow the range; omitted)
    }
This is the same use as decltype(b) b2 from "Declaration and definition" in ## I: decltype(_Count) is simply "the type of _Count". auto deduces the type, and decltype reuses that same type elsewhere.
Takeaway: traversing a container, reusing the type of some variable — these everyday forms are, inside the standard library, exactly the auto + decltype toolkit taught in this chapter. This is one of the core motivations for introducing them in C++11.
III. Important Notes
auto and const / reference stripping
auto deduction strips top-level const and references; to keep them you must write
const auto&/auto&explicitly, whereas decltype preserves the declared type exactly
int a = 1;
int &b = a;
const int c = 1;
const int &d = c;

auto a1 = a; // int
auto b1 = b; // int
auto c1 = c; // int
auto d1 = d; // int

const auto c2 = c;  // const int
const auto &d2 = d; // const int &

decltype(c) c3 = c; // const int
decltype(d) d3 = d; // const int &
This is also why auto a = obj.a; in "Class/Struct Member Type Deduction" yields int rather than const int — auto stripped the top-level const.
Difference between decltype(obj) and decltype( (obj) )
- Generally,
decltype(obj)obtains its declared type - While
decltype( (obj) )obtains the type of the(obj)expression (lvalue expression)
int a = 1;
decltype(a) b; // Deduction result is a's declared type int
decltype( (a) ) c; // Deduction result is the type of (a) lvalue expression int &
Difference between decltype(obj.b) and decltype( (obj.b) )
decltype( (obj.b) ): Type deduction from expression perspective, obj's definition type affects deduction result. For example, if obj is const-qualified, const will limit obj.b access to const.decltype(obj.b): Since it deduces the member's declared type, it won't be affected by obj's definition.
struct Object {
    const int a;
    double b;
    Object() : a(1), b(2.0) { }
};

int main() {
    Object obj;
    const Object obj1;

    decltype(obj.b)  // double
    decltype(obj1.b) // double

    decltype( (obj.b) ) // double &
    decltype( (obj1.b) ) // Affected by obj1's const qualification, so it's const double &
}
Rvalue Reference Variables are Lvalues in Expressions
int &&b = 1;

decltype(b) // Deduction result is declared type int &&
decltype( (b) ) // Deduction result is int &
IV. Practice Code
Practice Topics
- 0 - Declaration & Definition
- 1 - Expression Type Deduction
- 2 - Complex Type Deduction - Iterator / Function
- 3 - Function Return Type Deduction
- 4 - Class/Struct Member Type Deduction
- 5 - const & Reference Stripping and Preservation
Auto-Checker Commands
Don't have d2x yet? Click to expand setup
# 1. Install xlings (Linux / macOS)
curl -fsSL https://raw.githubusercontent.com/openxlings/xlings/main/tools/other/quick_install.sh | bash
# Windows PowerShell:
# irm https://raw.githubusercontent.com/openxlings/xlings/main/tools/other/quick_install.ps1 | iex

# 2. Install d2x and fetch this tutorial
xlings install d2x -y
d2x install d2mcpp

# 3. Enter the project directory & run the checker
cd d2mcpp
d2x checker auto-and-decltype
Exercise Discussion
V. Additional Resources
- Discussion Forum
- d2mcpp Tutorial Repository
- mcpp-community Organization
- Tutorial Video List
- Tutorial Support Tool - xlings
- Exercise Checker - d2x
Defaulted and Deleted Functions
= default and = delete are two function-definition forms introduced in C++11 that let the programmer state, at the source level, "I want the compiler to generate this special member with its default implementation" or "this function must not be called". They hand back to the designer the control over special members that previously could only be inferred from the compiler's implicit rules.
| Book | Video | Code | X |
|---|---|---|---|
| cppreference / markdown | Video Explanation | Practice Code |
Why were they introduced?
- Before C++11, as soon as a class declared any user-defined constructor, the compiler stopped synthesizing the default constructor — and there was no explicit way to "ask for it back"
- There was no standard way to express "I deliberately don't want this special member — calling it should be a compile error". The old workaround was "declare the copy constructor private and don't define it", which produced cryptic errors that surfaced only at link time
- Different compilers' implicit rules for "when a special member is auto-generated or auto-deleted" are easy to misremember; explicit markers let intent live directly in the code
What do = default and = delete mean?
= default: ask the compiler to generate this special member with its default implementation (default ctor / dtor / copy / move / [C++20] comparison operators, etc.) — equivalent to "I want the generated version; don't implicitly drop it just because I wrote some other member"= delete: explicitly forbid a function — any call to it, or any overload resolution that selects it, fails at compile time with a clear "use of deleted function" diagnostic
I. Basic Usage and Scenarios
Explicit default - Bring Back the Suppressed Default Constructor
The moment a class introduces any user-defined constructor, the compiler stops synthesizing the default constructor. The B below silently disallows B b;.
struct B {
    B(int x) { std::cout << "B(int x)" << std::endl; }
};

B b;        // error: no default constructor
B b2(10);   // ok
Adding = default brings the default constructor back without affecting the user-defined one.
struct B {
    B() = default;                                       // explicitly request the default ctor
    B(int x) { std::cout << "B(int x)" << std::endl; }   // user-defined ctor
};

B b;        // ok
B b2(10);   // ok
Similarly, in C below, having both a no-arg constructor and a one-arg constructor with a default value would create an ambiguity at C c;. Writing the no-arg version as = default and dropping the default value on the other makes the intent obvious.
struct C {
    C() = default;
    C(int x) { std::cout << "C(int x): " << x << std::endl; }
};

C c1;      // calls C()
C c2(1);   // calls C(int)
Explicit delete - Build a Non-Copyable Type
std::unique_ptr's key semantics are "exclusive ownership -> non-copyable but movable". A simplified hand-written version is just: = delete the two copy operations and = default the two move operations.
struct UniquePtr {
    void *dataPtr;
    UniquePtr() = default;

    UniquePtr(const UniquePtr&) = delete;             // forbid copy construction
    UniquePtr& operator=(const UniquePtr&) = delete;  // forbid copy assignment

    UniquePtr(UniquePtr&&) = default;                 // allow move construction
    UniquePtr& operator=(UniquePtr&&) = default;      // allow move assignment
};

UniquePtr a;
UniquePtr b = a;             // error: copy ctor is deleted
UniquePtr c = std::move(a);  // ok: move ctor
Type traits make it possible to verify these semantics at compile time.
static_assert(std::is_copy_constructible<UniquePtr>::value == false, "");
static_assert(std::is_copy_assignable<UniquePtr>::value    == false, "");
static_assert(std::is_move_constructible<UniquePtr>::value == true,  "");
static_assert(std::is_move_assignable<UniquePtr>::value    == true,  "");
Using = delete to "Mask" Specific Parameter Types in an Overload Set
= delete is not limited to special members — it works on any overload of any function. A common pattern is blocking implicit conversions by deleting the unwanted overload, so that calling with the wrong argument type fails at compile time.
void func(int x) {
    std::cout << "x = " << x << std::endl;
}

// Explicitly delete the float overload, otherwise func(1.1f) would silently
// be converted to int.
void func(float) = delete;

func(1);       // ok: int overload
func(1.1f);    // error: call of deleted function
Without that deleted overload, func(1.1f) would silently undergo a narrowing float -> int conversion and lose 0.1. With it removed from the overload set, the diagnostic is unambiguous: "use of deleted function 'void func(float)'".
Where default / delete Apply
= default is valid only on the special member functions the compiler can generate:
- default constructor (no arguments)
- destructor
- copy constructor / copy assignment
- move constructor / move assignment
- (C++20)
<=>and other defaulted comparison operators
= delete, on the other hand, has no such restriction — any function declaration (free function, member, template specialization, special member) can be deleted.
II. Important Notes
= default Does Not Imply "Trivial"
Writing = default just means "let the compiler generate it"; whether the generated version is trivial or noexcept depends on the bases and members. If a base's copy constructor is non-trivial, the derived class's = default copy constructor is also non-trivial.
struct HasString {
    std::string s;        // string's copy ctor is not trivial
    HasString(const HasString&) = default;
};

static_assert(!std::is_trivially_copy_constructible<HasString>::value, "");
If your code relies on triviality (memcpy-style copying, placement in a union, etc.), don't conclude anything from = default alone — verify it with std::is_trivially_* traits.
delete Works on Ordinary Functions Too
= delete is not exclusive to special members. Any function can be deleted — useful both for blocking specific overloads and for forbidding particular template specializations.
template <typename T>
void only_int(T) = delete;   // forbid everything by default

template <>
void only_int<int>(int x) {  // only allow int
    std::cout << x << std::endl;
}

only_int(1);       // ok
only_int(1.0);     // error: call of deleted function
Don't Make Deleted Members private
The pre-C++11 idiom for non-copyable types declared the copy ctor / copy assign as private and left them undefined. That style is obsolete — switch to = delete (in the public section), because:
= deletereports the error during overload resolution with a clear diagnostic; private + undefined surfaces only as a link-time error- Putting it in public guarantees every caller sees the same diagnostic; otherwise friends or in-class members would still resolve the call and run into a different error shape
Rule of 0 / 3 / 5 - Designing Classes With default and delete
The real design value of = default / = delete shows up in combination with the Rule of 0 / 3 / 5:
- Rule of 0: the class manages no resources directly and relies entirely on members' RAII (e.g.
std::string,std::vector,std::unique_ptr) -> declare none of the special members and let the compiler synthesize them - Rule of 3 (C++98): if you implement any of copy ctor, copy assign, or destructor, you typically need to implement the other two
- Rule of 5 (C++11): with move semantics added, include move constructor and move assignment too — once you explicitly define / delete / default any one of these five, write all five out so that the compiler's implicit rules can't surprise you
III. Practice Code
Practice Topics
- 0 - Explicitly control constructor generation behavior
- 1 - Implement a non-copyable but movable UniquePtr
- 2 - Use = delete to block a specific parameter-type overload
Practice Code Auto-detection Command
d2x checker default-and-delete
d2x checker default-and-delete-1
d2x checker default-and-delete-2
IV. Additional Resources
final and override - Explicit Control of Virtual Function Behavior
final and override are two context-sensitive identifiers introduced in C++11, used in virtual-function inheritance to explicitly express the intent of overriding and sealing, allowing the compiler to surface polymorphism mismatches at compile time that would otherwise only show up as runtime bugs.
| Book | Video | Code | X |
|---|---|---|---|
| cppreference-final / cppreference-override / markdown | Video Explanation | Practice Code |
Why were they introduced?
- Before C++11, whether a derived class actually overrode a base virtual function relied entirely on programmers checking signatures by hand — a single mismatched parameter would silently turn an override into a name-hiding declaration with no compiler warning
- There was no standard way to express the design intent that "this type, or this polymorphic chain, ends here"
- They make the design contract of virtual functions readable and verifiable
What's the difference between the two?
- override: applied after a derived-class member function, explicitly declaring "this function overrides a base-class virtual function", so the compiler can verify it
- final: applied after a virtual function means "this virtual function cannot be further overridden"; applied after a class means "this class cannot be inherited from"
I. Basic Usage and Scenarios
override - Explicitly Declare an Override
Without override, even a typo in the derived signature only becomes "a brand-new ordinary function" — the polymorphic behavior is silently lost.
struct Base {
    virtual void func(int) { }
};

struct Derived : Base {
    void func(double) { } // intended to override, but the parameter type is wrong;
                          // this actually declares a new function
};
With override, the same mistake is rejected at compile time.
struct Derived : Base {
    void func(double) override; // error: no matching virtual function in any base class
};
Only a base virtual function whose signature (return type + parameter list + cv-qualifiers + ref-qualifiers) matches exactly will satisfy override.
struct Base {
    virtual void func(int);
};

struct Derived : Base {
    void func(int) override; // ok
};
final - Forbid Further Overriding or Inheritance
final has two usages targeting different things.
On a virtual function - cut off the polymorphic chain
struct A {
    virtual void func() final { }
};

struct B : A {
    void func() override; // error: A::func is final and cannot be overridden
};
On a class - forbid inheritance
struct B final { };

struct C : B { }; // error: B is final and cannot be inherited from
final + Pure Virtual - Non-Overridable Template Method (NVI)
Lock the outer interface with virtual ... final, and expose the customizable steps as pure virtual functions. The result is a stable interface where the execution order cannot be changed but each step is customizable. This is a concise expression of the Non-Virtual Interface idiom.
struct AudioPlayer {
    virtual void play() final {  // subclasses cannot change the overall flow of play
        init_audio_params();
        play_audio();
    }
private:
    virtual void init_audio_params() = 0; // left for subclasses to customize
    virtual void play_audio() = 0;
};

struct WAVPlayer : AudioPlayer {
    void init_audio_params() override { /* ... */ }
    void play_audio() override { /* ... */ }
};

struct MP3Player : AudioPlayer {
    void init_audio_params() override { /* ... */ }
    void play_audio() override { /* ... */ }
};
Callers always use the unified AudioPlayer::play(); each format's player only needs to implement the two hooks. This structure is common when designing plugin-style or protocol-style interfaces.
Context-Sensitive Identifiers
Neither override nor final is a reserved word or a keyword — they are context-sensitive identifiers. They only carry these meanings when they appear at specific positions in a virtual function declaration or a class declaration; in any other position they can still be used as variable names, type names, namespace names, etc.
B override; // ok: here override is just an ordinary variable name
B final;    // ok: here final is just an ordinary variable name
This is a deliberate compromise in the C++ standard for backward compatibility: existing code that uses override or final as identifiers won't fail to compile after upgrading to C++11.
II. Important Notes
override Requires a Signature-Matching Base Virtual Function
Once override is added to a derived-class member function, the compiler requires a virtual function with a matching signature to exist in some base class — otherwise it's a compile error. This is the core value of override: lifting "override mismatch" silent bugs from runtime to compile time.
struct A {
    virtual void func1() { }
    void func2() { } // note: not virtual
};

struct B : A {
    void func1() override; // ok
    void func2() override; // error: A::func2 is not virtual
};
A final Class Is "Sealed" - Use With Care
A final class cannot be inherited from at all, not even to add a couple of helper methods. Marking a class final is essentially committing to "this type is, by design, a leaf node". Some rules of thumb:
- The type is explicitly not meant to be extended further (e.g. error types, framework-internal implementation classes, singletons) -> a good fit for final
- A general-purpose base class or a framework-provided extension point -> do not casually add final
final Only Applies to Virtual Functions
An ordinary member function cannot be overridden in the first place, so adding final to it is meaningless and the compiler will reject it.
struct A {
    void func() final; // error: final cannot be applied to a non-virtual function
};
override and final Can Be Used Together
If a virtual function should both override the base-class version and forbid further overriding in derived classes, you can combine the two.
struct B : A {
    void func() override final; // overrides A::func, and prevents C from overriding it again
};
III. Practice Code
Practice Topics
- 0 - Familiarize with override
- 1 - Familiarize with final
- 2 - final + Template Method - AudioPlayer / WAV / MP3 / OGG
Practice Code Auto-detection Command
d2x checker final-and-override
IV. Additional Resources
Trailing Return Type
The trailing return type is a new function declaration syntax introduced in C++11: auto func(...) -> ReturnType. It moves the return type from before the function name to after the parameter list. This solves a problem that the traditional syntax simply cannot express - "return type that depends on parameters" - and also provides the unified syntax for explicitly specifying lambda return types.
| Book | Video | Code | X |
|---|---|---|---|
| cppreference / markdown | Video Explanation | Practice Code |
Why was it introduced?
- In the traditional syntax, the return type is written before the function name, at which point the parameters are not yet in scope, so they cannot be used to deduce the return type
- Template programming often needs "return type = type of some expression involving the parameters", and without this syntax, deducing such a return type with decltype is essentially impossible to write
- It unifies function-signature shape: lambdas, ordinary functions, and template functions can all use the same
auto ... -> Tform
How does it differ from the traditional return-type syntax?
- Traditional form:
ReturnType func(Args...), with the return type at the front - Trailing form:
auto func(Args...) -> ReturnType, using auto as a placeholder and putting the actual return type after-> - The two are equivalent in most cases, but only the trailing form can reference parameter names after
->- this is its truly irreplaceable capability
I. Basic Usage and Scenarios
Basic Syntax - auto + ->
Move the return type from in front of the function name to after the parameter list, joined by ->. Use auto as a placeholder before the function name to indicate "the return type is given later".
// Traditional form
int add(double a, int b) {
    return a + b;
}

// Trailing-return-type form - equivalent
auto add(double a, int b) -> int {
    return a + b;
}
The compiled output of these two forms is identical. For an ordinary function, the trailing form is purely a stylistic choice and adds no new capability.
Combining decltype to Deduce a Parameter-Dependent Return Type
The real power of trailing return types shows up in templates. Suppose we want a generic add that supports int, double, Point, and any addable types. The return value should be the type of a + b, but the concrete type depends on T1 and T2.
The traditional form cannot be written here, because at the point where the return type appears, a and b are not yet in scope.
// Cannot be written - a and b are not declared yet here
decltype(a + b) add(T1 a, T2 b);
The trailing syntax moves the return type after the parameters, where a and b are already in scope, so decltype can refer to them directly.
template<typename T1, typename T2>
auto add(const T1 &a, const T2 &b) -> decltype(a + b) {
    return a + b;
}

add(1, 2);     // returns int
add(1.1, 2);   // returns double
add(1, 2.1);   // returns double
This is the single irreplaceable use case of the trailing return type: letting the return-type expression refer to parameter names.
Since C++14, an ordinary function can simply be written as
auto add(...)and the compiler will deduce the return type from the return statement, so-> decltype(a + b)is no longer required in most cases. But in C++11, the trailing form is still mandatory.
Explicit Return Type for Lambdas
A lambda has no name, and therefore no choice of "where to put the return type" - it can only use the trailing syntax from the start.
auto add = [](double a, double b) -> int {
    return a + b;  // explicitly truncated to int
};

add(1.1, 2.1); // 3, not 3.2
Without -> int, the lambda would deduce its return type as double; once explicitly annotated, the return value is converted to the specified type. This is the standard way to control a lambda's return type.
Nested / Member Types as Return Types
When the return type is a class's nested type, the traditional form needs a fully qualified typename Class::Inner up front, with extra typename inside templates - long and verbose.
template<typename T>
typename std::vector<T>::iterator find_first(std::vector<T> &v, T x);
The trailing form lets the function name appear first and writes the return type after ->. In some class-member-function definitions, this also avoids repeating the class name prefix.
struct Box {
    struct Inner { /* ... */ };

    auto make() -> Inner;  // return type is just Inner
};

auto Box::make() -> Inner {  // already inside the scope of Box at this point
    return Inner{};
}
II. Important Notes
auto in the Trailing Form Is Only a Placeholder
The auto in the trailing form is not type deduction - it is just a syntactic placeholder, with the actual type given after ->. This is different from C++14's auto func() { return ...; }, where the compiler genuinely deduces the type.
auto add(double a, int b) -> int {  // C++11: return type is given explicitly by -> int
    return a + b;
}

auto add(double a, int b) {         // C++14: return type is deduced from the return statement
    return a + b;
}
In C++11, writing auto func() without -> is a compile error.
When to Use Trailing vs. Traditional
Don't blindly convert every function to the trailing form. Some rules of thumb:
- Return type depends on parameters (e.g. decltype(a + b)) -> trailing is mandatory
- Lambda needs an explicit return type -> trailing is mandatory
- Member function returning a nested type, where you'd like to skip the
Class::prefix -> trailing is cleaner - Ordinary function with a simple return type (int / void / std::string) -> the traditional form reads better; no need to switch
Not Every "auto func" Form Is a Trailing Return Type
auto func() -> int (C++11 trailing) and auto func() { return 1; } (C++14 return-type deduction) both start with auto, but their semantics are completely different.
- The former: auto is a placeholder, the real type is given by
->, and the compiler does not need to see the function body - The latter: the compiler must see the return statement to deduce the return type, so the declaration and definition cannot be cleanly separated (a header containing only the declaration cannot expose the return type)
When writing functions that need to be declared in a header and defined in a source file, this difference directly affects whether the code compiles at all.
Return-Type Rules Still Apply
The trailing return type only changes the position - the rules of the type itself are unchanged:
- Cannot return a function or an array directly (need a function pointer / array pointer)
- References / const qualifications deduced by decltype are preserved
- When a derived class overrides a virtual function, the return type still has to satisfy the covariant-return rule
int arr[3];
// auto func() -> int[3];  // error: cannot return an array
auto func() -> int(*)[3];   // ok: returns a pointer to an array
III. Practice Code
Practice Topics
Practice Code Auto-detection Command
d2x checker trailing-return-type
IV. Additional Resources
Rvalue References
Rvalue reference T&& is a new kind of reference introduced in C++11 that binds precisely to rvalues / about-to-expire objects. It lets the compiler distinguish "a temporary whose resources can be stolen" from "a named object that must be preserved" during overload resolution, and it is the syntactic foundation for move semantics and perfect forwarding.
| Book | Video | Code | X |
|---|---|---|---|
| cppreference / markdown | Video Explanation | Practice Code |
Why was it introduced?
- Before C++11, the only way to bind a temporary was
const T&, which gave a read-only view — there was no way to reuse its resources without copying - There was no mechanism that could "recognize an rvalue" at the overload-resolution level, so the compiler could not separate "constructed from a temporary" from "constructed from a normal object"
- It provides the syntactic foundation for move semantics (
std::move) and perfect forwarding (std::forward), making "stealing resources from an expiring object" something the language can express
What's the difference between lvalues and rvalues?
- lvalue: an expression with a name, persistent storage, and an addressable identity — for example a declared variable
- rvalue: usually a literal, a temporary, or a non-reference function return value — short-lived and not directly addressable
- Rule of thumb: if it can appear on the left of
=and you can take its address with&, it's an lvalue; otherwise it's most likely an rvalue
I. Basic Usage and Scenarios
Telling lvalues and rvalues Apart
To classify an expression, ask whether it has "a name + a persistent identity".
int a = 1;        // a is an lvalue
int b = a + 1;    // a + 1 is an rvalue (no name, just a temporary result)

&a;        // ok: an lvalue is addressable
// &(a + 1); // error: an rvalue is not addressable

int &lref  = a;       // ok: lvalue reference binds an lvalue
// int &lref2 = a + 1; // error: a plain lvalue reference cannot bind an rvalue
Declaring and Binding an Rvalue Reference
T&& is the rvalue-reference syntax. It only binds to rvalues.
int &&rref1 = 10;        // ok: a literal is an rvalue
int &&rref2 = a + 1;     // ok: a temporary computation is an rvalue

// int &&rref3 = a;      // error: an rvalue reference cannot bind an lvalue directly
Once bound, the temporary's lifetime is extended to the end of the reference variable's scope — same as the rule for const T& — except that an rvalue reference gives you a mutable view.
struct Object {
    int data = 0;
};

const Object &cref = Object(); // lifetime extended, but read-only
// cref.data = 1;              // error: cannot mutate through a const reference

Object &&rref = Object();      // lifetime extended, and writable
rref.data = 1;                 // ok
This is exactly what the practice code is verifying: objRef.data = 1; must compile, while &objRef still points to the same temporary whose lifetime was extended.
Distinguishing lvalues and rvalues in Overloads
Using an rvalue reference as a function parameter lets the compiler take two different overload paths for "passing an lvalue" vs "passing an rvalue".
struct Object {
    Object() { std::cout << "Object()\n"; }
    Object(const Object&) { std::cout << "Object(const Object&)\n"; }
    Object(Object&&)      { std::cout << "Object(Object&&)\n"; }
};

void use(const Object&) { std::cout << "use lvalue\n"; }
void use(Object&&)      { std::cout << "use rvalue\n"; }

int main() {
    Object a;
    use(a);          // -> use lvalue   (a is an lvalue)
    use(Object());   // -> use rvalue   (a temporary is an rvalue)
}
The practice's Object defines both a copy constructor Object(const Object&) and a move constructor Object(Object&&) precisely so the prints tell you "which path was taken".
Extending a Temporary's Lifetime
Here is the simplified scenario from the exercise: bind the prvalue Object() to a reference, and the temporary's destruction is deferred until the reference variable leaves scope.
{
    Object &&objRef = Object(); // temporary's lifetime extended to here
    objRef.data = 1;            // mutate it through the rvalue reference
} // destructor runs here
Switching to const Object &objRef = Object(); extends the lifetime in the same way, but the line objRef.data = 1; would no longer compile — that is the most direct difference between const T& and T&& in this scenario.
II. Important Notes
An Rvalue Reference Variable Itself Is an lvalue
In int &&rref = 10;, the name rref has identity and is addressable, so when used in an expression it is an lvalue — no longer an rvalue.
void use(const Object&) { std::cout << "lvalue path\n"; }
void use(Object&&)      { std::cout << "rvalue path\n"; }

Object &&rref = Object();
use(rref); // -> lvalue path  (rref is an lvalue in expressions!)
If you want to pass it on as an rvalue again, you must explicitly cast with std::move(rref) — which is the entry point into the next chapter on move semantics.
Overload Resolution Between const Reference and Rvalue Reference
When both const T& and T&& overloads exist, the compiler prefers the T&& version for an rvalue argument.
void f(const Object&) { std::cout << "const &\n"; }
void f(Object&&)      { std::cout << "&&\n"; }

f(Object()); // -> &&     (rvalue prefers the rvalue reference)

Object a;
f(a);        // -> const & (lvalue matches the const lvalue reference)
This rule is what allows STL containers (such as std::vector::push_back) to take separate "copy" and "move" paths depending on the value category of the argument.
Don't Confuse T&& With "Universal Reference"
In template argument deduction, T&& becomes a "universal / forwarding reference", which behaves differently from a plain rvalue reference — the same syntax in template<typename T> void f(T&&) accepts both lvalues and rvalues. That belongs to perfect forwarding and is covered later. For now, just remember: in non-template contexts, T&& is an rvalue reference and accepts only rvalues.
void g(Object&& o);             // accepts rvalues only
template<typename T> void h(T&&); // universal reference, accepts both
Rvalue References Are the Entry Point of Move Semantics, Not the Whole Story
This chapter focuses on the value-category + reference-binding layer. The part where rvalue references actually "steal resources" (move constructor / move assignment / std::move) is covered in ch05. That said, the move-constructor print Object(Object&&) in the practice already lets you observe end-to-end how "rvalue argument -> move path" works.
III. Practice Code
Practice Topics
Practice Code Auto-detection Command
d2x checker rvalue-references
IV. Additional Resources
Move Semantics
Move semantics is a resource ownership transfer mechanism introduced in C++11 on top of rvalue references. It lets one object hand over its underlying resources to another instead of deep-copying them, dramatically reducing the cost of copying types that own heap allocations, file handles, or large buffers.
| Book | Video | Code | X |
|---|---|---|---|
| cppreference-move / cppreference-move-ctor / markdown | Video Explanation | Practice Code |
Why was it introduced?
- Before C++11, temporaries, function return values, and intermediate results could only be passed by copy-construct + destroy, paying a full deep copy even when the source was about to be discarded
- Types like
std::vector,std::string, file-handle wrappers, and self-managed buffers have copy costs that scale with resource size, which becomes painful during container reallocation or function return - A language-level mechanism was needed so that "an object that's about to be thrown away" could simply hand its resources to a new object instead of being copied and then destroyed
How is move different from copy?
- Copy: the new object allocates its own fresh resource, then byte-by-byte copies content from the source; the source remains intact
- Move: the new object takes over the source's internal pointer / handle directly, leaving the source in a "hollowed-out" valid-but-unspecified state where typically only destruction is safe
- Copy is O(resource size); move is usually O(1) — just a few pointer assignments
I. Basic Usage and Scenarios
What is std::move — It's a cast, not an actual "move"
The name std::move is highly misleading. It does not move anything and does not modify the object. All it does is cast an lvalue to an rvalue reference type so that overload resolution prefers the version taking T&&.
A close-to-real implementation looks like this.
template <typename T>
typename std::remove_reference<T>::type&& move(T&& v) noexcept {
    return static_cast<typename std::remove_reference<T>::type&&>(v);
}
The actual "resource transfer" is done by the move constructor / move assignment operator. std::move only labels the object as "I'm OK to be hollowed out"; the construction or assignment that follows is what really hollows it.
Buffer a;
Buffer b = std::move(a); // std::move(a) just casts a to Buffer&&;
                         // the actual transfer happens in Buffer's move constructor
If a type does not define a move constructor / move assignment, std::move silently degrades to a copy and the compiler does not warn. This is the most common beginner trap.
The Shape of Move Constructor / Move Assignment
Both have a fixed signature taking an rvalue reference T&& of the same type. The standard pattern is: steal the source's resource pointer, then null out the source, so destroying both objects later doesn't double-free.
struct Buffer {
    int *data;

    Buffer() : data { new int[2] {0, 1} } { }

    // Move constructor: take over other's resource, then null out other
    Buffer(Buffer&& other) noexcept : data { other.data } {
        other.data = nullptr;
    }

    // Move assignment: release our old resource first, then take over,
    // then null out other
    Buffer& operator=(Buffer&& other) noexcept {
        if (this != &other) {
            delete[] data;
            data = other.data;
            other.data = nullptr;
        }
        return *this;
    }

    ~Buffer() {
        if (data) delete[] data;
    }
};
Three details to note.
noexceptis practically required:std::vectorand friends will only use the move constructor during reallocation if it's declared noexcept, otherwise they fall back to copy to preserve the strong exception guarantee- Move assignment needs self-assign check + release of old resource, in that order
- The destructor must tolerate
data == nullptr, because that's exactly the state of a moved-from object
When the Compiler Auto-Generates Move (and When It Doesn't)
The compiler auto-generates a default move constructor and move assignment when
- The user has not declared any of: copy constructor, copy assignment, destructor, move constructor, move assignment
If the user explicitly declares any one of these, the move operations will not be auto-generated. (This is the motivation behind the "Rule of 5": once you customize one of them, you should review all five.)
struct Foo {
    std::vector<int> v;
    // No special members declared -> move ctor/assign auto-generated,
    // forwards directly to v
};

struct Bar {
    std::vector<int> v;
    ~Bar() { /* any custom body */ }
    // Custom destructor -> move ctor/assign NOT auto-generated;
    // copies will fall back to deep copies of v
};
If the default member-wise move semantics is enough (e.g. all members are types like std::vector / std::unique_ptr that already support move), don't write your own. To force them in explicitly, use = default.
struct Bar {
    std::vector<int> v;
    ~Bar() { }
    Bar(Bar&&) = default;
    Bar& operator=(Bar&&) = default;
};
What Resource Ownership Transfer Actually Buys You
Back to the opening example: Buffer owns a heap-allocated chunk. Without move semantics, process(Buffer()) triggers multiple "allocate + copy + destroy" rounds.
Buffer process(Buffer buff) {  // construct on parameter
    return buff;               // construct on return value
}

Buffer b = process(Buffer());  // construct the temporary argument too
Once a move constructor exists, temporaries and local variables automatically pick the Buffer&& overload at consumption sites. The whole chain does exactly one new int[2], all intermediate objects share the same buffer, and delete[] runs only once when the last object is destroyed. That's exactly what 05-move-semantics-0.cpp wants you to observe firsthand from the compiler output.
The same idea generalizes to any "resource-owning" type: std::unique_ptr, file-handle wrappers, RAII network connections, large image / audio buffers — they all rely on move semantics to drive the transfer cost down to nearly zero.
II. Important Notes
A Moved-From Object Is in a "Valid-But-Unspecified" State
The standard only guarantees two things about a moved-from object.
- The destructor can be called safely
- The object satisfies its minimal type invariants (you, the implementer, decide what those are)
It does not guarantee any "original content" or any particular state. In 05-move-semantics-2.cpp you'll see b1.data_ptr() == nullptr after the move — that's because our implementation explicitly nulls it out, not something the language enforces. Once a move has happened, do not read the moved-from object's contents; only assign a new value or let it be destroyed.
Buffer b1;
Buffer b2 = std::move(b1);
// b1 is now in a valid-but-unspecified state:
b1.data_ptr();  // do not use b1's "business data" like this
b1 = Buffer();  // ok: reassign
// destruction at end of scope is also safe
"Rule of 0 / 3 / 5"
- Rule of 0: prefer to delegate resource management to standard types that already support move (
std::vector,std::unique_ptr,std::string...) and write zero special members yourself; the compiler handles everything for you - Rule of 3 (C++98): once you customize one of destructor / copy constructor / copy assignment, you usually need to customize the other two
- Rule of 5 (C++11): on top of Rule of 3, also add move constructor / move assignment — once you take over resource management, all five special members should be designed together; otherwise you end up with inconsistencies like "copyable but not movable" or "movable but in a broken state after the move"
The safest strategy is still Rule of 0: let standard library types own the resources, and let your class just compose them.
Don't Overuse std::move (Especially When Returning a Local)
When you write return localObj; directly, the compiler has NRVO / RVO (named / unnamed return value optimization) and can construct the object directly in the caller's frame — not even a move is needed. Writing return std::move(localObj); actually suppresses NRVO, forcing a move and giving you worse performance.
Buffer good() {
    Buffer b;
    return b;            // ok: prefers NRVO, falls back to move
}

Buffer bad() {
    Buffer b;
    return std::move(b); // not recommended: kills NRVO, forces a move
}
Similarly, a by-value parameter is already a fresh object, so only consider std::move when forwarding it further out of the function. Applying std::move to a const object is also pointless: the result is a const rvalue reference, and overload resolution falls back to the copy constructor.
III. Practice Code
Practice Topics
- 0 - Move constructor and trigger conditions - make buffer passing allocate only once
- 1 - Move assignment and trigger conditions - temporary / intermediate / explicit std::move
- 2 - Moving resources, not objects - compare object addresses vs. data pointers
Practice Code Auto-detection Command
d2x checker move-semantics
d2x checker move-semantics-2
IV. Additional Resources
Scoped Enums
Scoped enums (enum class / enum struct) are strongly-typed enumerations introduced in C++11. They address several long-standing problems with traditional enum: enumerator names leaking into the enclosing scope, implicit conversion to int, and an underlying type that the programmer cannot control — turning enum values into a truly independent, type-safe set of discrete constants.
| Book | Video | Code | X |
|---|---|---|---|
| cppreference / markdown | Video Explanation | Practice Code |
Why was it introduced?
- Traditional enum values leak into the enclosing scope, easily clashing with other names
- Traditional enums implicitly convert to int, leading to unsafe arithmetic and comparisons
- Traditional enums cannot specify an explicit underlying type, leaving the size unpredictable across platforms and compilers
How does it differ from a traditional enum?
- enum class enumerators do not leak into the enclosing scope; they must be accessed via
EnumName::Value, and the same enumerator name can be reused across different enums - enum class does not implicitly convert to an integral type; you must use
static_castwhenever you need a number, and values from different enum classes cannot be compared - enum class lets you specify an explicit underlying type (e.g.
: uint8_t), giving precise control over memory layout, and also supports forward declaration
I. Basic Usage and Scenarios
Basic Syntax of enum class
enum class is the keyword combination for scoped enums (enum struct is equivalent). Just put class after the traditional enum keyword.
enum class Color {
    RED,
    GREEN,
    BLUE,
    ORANGE
};

enum class Fruit {
    Apple,
    Banana,
    ORANGE // It is fine to share the name with Color::ORANGE — they live in different scopes
};
If these were traditional enums in the same scope, the duplicated ORANGE would cause a compile error.
Explicit Scoping - Access via EnumName::Value
Enumerators of a scoped enum are not exposed to the enclosing scope, so accessing them always requires the enum name as a prefix.
Color color = Color::ORANGE; // ok
Fruit fruit = Fruit::ORANGE; // ok — distinct from Color::ORANGE

// Color c = ORANGE; // error: ORANGE does not exist in the current scope
This forced prefix makes it immediately clear which enum a constant belongs to when reading the code, and completely eliminates symbol clashes.
No Implicit int Conversion - Safer Comparisons and Arithmetic
A traditional enum implicitly decays to int, so a "color == fruit" comparison is silently accepted:
enum Color { RED, GREEN, BLUE };
enum Fruit { Apple, Banana };

Color c = RED;
if (c == Apple) { /* compiles! Effectively 0 == 0, always true */ }
A scoped enum rejects such mistakes at compile time:
enum class Color { RED, GREEN, BLUE };
enum class Fruit { Apple, Banana };

Color c = Color::RED;
// if (c == Fruit::Apple) { } // error: cannot compare different enum types
// int n = c;                 // error: no implicit conversion to int
int n = static_cast<int>(c);  // ok: must be an explicit cast
== / != between two values of the same enum class is fine, but comparisons across different enums or against integers are rejected.
Explicit Underlying Type - enum class X : uint8_t
The default underlying type of a scoped enum is int. You can specify a different one with : type, giving precise control over memory footprint.
enum class Color {           // default underlying type is int
    RED, GREEN, BLUE
};

enum class Color8Bit : int8_t {   // explicitly int8_t
    RED, GREEN, BLUE, ORANGE
};

static_assert(sizeof(Color)     == sizeof(int),    "");
static_assert(sizeof(Color8Bit) == sizeof(int8_t), "");
Enumerator values can also be specified explicitly; any unspecified ones simply continue from the previous value + 1.
enum class ErrorCode : int {
    OK      = 0,
    ERROR_1,        // 1
    ERROR_2 = -2,
    ERROR_3 = 3     // explicitly 3
};

static_cast<int>(ErrorCode::ERROR_3); // 3
This is invaluable for protocols, network packets, embedded registers, and anywhere memory layout matters.
Forward Declaration Support
Because the underlying type of a scoped enum is fixed at declaration time (defaulting to int or explicitly given), you can declare it without listing the enumerators — a forward declaration.
// header
enum class Status : uint8_t;       // forward declaration ok

void handle(Status s);             // usable in interfaces immediately

// .cpp
enum class Status : uint8_t {
    Ok, Pending, Failed
};
A traditional enum can't be forward-declared this way because its underlying type is inferred from the range of its enumerators (unless you also pin the underlying type explicitly, which is itself a C++11 extension).
II. Important Notes
When You Genuinely Need a Number, Use static_cast
A scoped enum does not auto-convert to int, so anytime you feed an enum value to an array index, a serializer, a logger, or an integer-only API, an explicit cast is required.
enum class Color { RED, GREEN, BLUE };

Color c = Color::GREEN;

// int idx = c;                       // error
int idx = static_cast<int>(c);        // ok

std::cout << static_cast<int>(c);     // ok: otherwise << has no matching overload
Going the other way — building an enum value from an integer — also requires a cast: Color c = static_cast<Color>(1);. This deliberate friction nudges you to confirm the conversion is intentional and safe.
Scoped Enums Don't Work as Bitmasks Out of the Box - Cast or Overload operator|
Traditional enums are often used as bit flags because FLAG_A | FLAG_B works directly. With scoped enums, the lack of implicit int conversion means this no longer compiles.
enum class Perm : uint32_t {
    Read  = 1 << 0,
    Write = 1 << 1,
    Exec  = 1 << 2
};

// auto p = Perm::Read | Perm::Write; // error: no operator|
Two common workarounds:
// Option 1: cast at the call site
auto p = static_cast<Perm>(
    static_cast<uint32_t>(Perm::Read) |
    static_cast<uint32_t>(Perm::Write)
);

// Option 2: overload operator| for this enum
constexpr Perm operator|(Perm a, Perm b) {
    return static_cast<Perm>(
        static_cast<uint32_t>(a) | static_cast<uint32_t>(b)
    );
}
After Option 2 you can write Perm::Read | Perm::Write naturally while keeping type safety.
Migrating Legacy Traditional Enums
Existing codebases tend to be full of traditional enums; you don't need to rewrite them all in one go. A pragmatic plan:
- Default new code to
enum class - When touching old code, prioritize "names that are obviously prone to clash" and "comparisons that rely on implicit int conversion"
- For memory-layout-sensitive enums, also pin the underlying type with
: uint8_t/: uint16_tetc. while you're there - For bit-flag use cases, prefer casting or overloading
operator|/operator&; don't fall back to traditional enums
III. Practice Code
Practice Topics
- 0 - Pitfalls of traditional enum - name clashes and implicit comparison
- 1 - Basic usage of scoped enum - scoping / type safety / underlying type
Practice Code Auto-detection Command
d2x checker scoped-enums
d2x checker scoped-enums-1
IV. Additional Resources
constexpr - Compile-Time Computation
constexpr is a keyword introduced in C++11 that lifts "results that would normally only be available at runtime" up to compile time, so the compiler has the concrete value before code generation, while still keeping the same code callable at runtime.
| Book | Video | Code | X |
|---|---|---|---|
| cppreference / markdown | Video Explanation | Practice Code |
Why was it introduced?
- Move computations that can be done at compile time off the runtime hot path
- Give the compiler stronger invariant guarantees (array sizes, template non-type parameters, and other positions that strictly require compile-time constants can now be filled with the result of a function call)
- Pair naturally with template metaprogramming / static_assert / enum, explicitly stating "this value is a compile-time known quantity"
How is constexpr different from const?
- const: "I won't modify it" — the value may not be known until runtime; once initialized, it just can't be changed
- constexpr: "this value is fixed at compile time" — a stronger contract that the compiler must be able to evaluate
- Every constexpr variable is also const, but not every const can be used where
constexpris required (e.g. array dimensions, template non-type parameters)
I. Basic Usage and Scenarios
constexpr Variables — Must Be Initialized With a Compile-Time Constant
A constexpr variable's initializer must be evaluable at compile time, otherwise it's a hard compile error. The whole point is "compile-time constant".
int n = 10;
const int a = n + 10;     // ok: a is const, but its value is determined at runtime
constexpr int b = 10 * 3; // ok: b is 30 at compile time
// constexpr int c = n;   // error: n is a runtime variable, can't initialize a constexpr
const only promises "no further modification", whereas constexpr additionally requires "computable right now".
Compile-Time vs Runtime Constant — The Difference at Array Dimensions
In C++, array dimensions must be compile-time constants. At this position, neither a plain int nor a "const derived from a runtime variable" is reliable — only constexpr is guaranteed to work.
int size1 = 10;
const int size2 = size1 + 10;
constexpr int size3 = 10 * 3;

int arr1[size3]; // ok: size3 is a compile-time constant
// int arr2[size1]; // error: size1 is a runtime variable
// int arr3[size2]; // depends on the compiler: size2 is derived from size1, not necessarily compile-time
In Exercise 0 you have to pick the one sizex that is reliably known at compile time inside arr1[sizex] — the answer is size3.
constexpr Functions — Usable at Both Compile Time and Runtime
The defining property of a constexpr function is its dual nature: pass it compile-time constant arguments and it runs at compile time; pass it runtime variables and it falls back to a normal function call.
constexpr int sum_for_1_to(int n) {
    return n == 1 ? 1 : n + sum_for_1_to(n - 1);
}

int main() {
    constexpr int s1 = sum_for_1_to(4); // computed to 10 at compile time
    int n = 5;
    int s2 = sum_for_1_to(n);           // computed at runtime
}
Note: marking a function constexpr does not force it to always run at compile time — whether it does depends on where it is used and what arguments it receives.
Using constexpr Functions Where Compile-Time Constants Are Required
Array dimensions, template non-type parameters, static_assert, case labels — all require compile-time constants. Wrapping the calculation in a constexpr function lets you call it directly in any of these positions.
constexpr int factorial(int n) {
    return n <= 1 ? 1 : n * factorial(n - 1);
}

constexpr int fact_10 = factorial(10);
int arr[factorial(5)];                  // array dimension: ok
static_assert(factorial(5) == 120, ""); // static_assert: ok
Pairing With Templates for Compile-Time Computation
Template non-type parameters (template <int N>) also require compile-time constants. constexpr functions and constexpr variables both satisfy that.
template <int N>
struct Sum {
    static constexpr int value = Sum<N - 1>::value + N;
};

template <>
struct Sum<1> { static constexpr int value = 1; };

constexpr int sum_4 = Sum<4>::value; // 10 at compile time
Combining factorial and Sum lets you solve small problems entirely at compile time — for example Exercise 1 asks "what value of value makes value! + (1+2+..+value) > 10000?", with no runtime work needed.
constexpr int value = 8;
constexpr int f = factorial(value);
constexpr int s = Sum<value>::value;
constexpr int ans = f + s;
static_assert(ans > 10000, "ans should be > 10000");
C++11 Restrictions on constexpr Function Bodies
C++11's rules for constexpr function bodies are strict:
- The body is essentially limited to a single return statement (use the ternary
?:for branching) - No loops (use recursion instead)
- No local variable definitions, no mutation
// ok: C++11-style constexpr function — single return + ternary + recursion
constexpr int factorial(int n) {
    return n <= 1 ? 1 : n * factorial(n - 1);
}
C++14 relaxed these restrictions, allowing local variables, loops, and multiple statements — making constexpr functions look almost identical to ordinary ones. For this C++11 chapter, however, we stick to the "single return + recursion" pattern.
II. Important Notes
Passing a Runtime Argument to a constexpr Function Is Not an Error — It Just Runs at Runtime
constexpr is a capability declaration, not a usage requirement. The same constexpr function is forced to run at compile time when initializing a constexpr variable, and runs as an ordinary runtime function in normal assignments.
constexpr int factorial(int n) {
    return n <= 1 ? 1 : n * factorial(n - 1);
}

int n = 5;
int a = factorial(n);           // ok: runtime call (n is a runtime variable)
constexpr int b = factorial(5); // ok: compile-time call
// constexpr int c = factorial(n); // error: constant context needed, but n isn't constant
Functions Called Inside a constexpr Function Must Themselves Be constexpr
If a constexpr function internally calls a non-constexpr function, it can't be used in a compile-time context — the compiler will refuse to treat the whole expression as a constant expression.
double pow(double base, int exp) {              // not constexpr
    return exp == 0 ? 1.0 : base * pow(base, exp - 1);
}

constexpr double mysin(double x) {
    return x - pow(x, 3) / 6.0; // error: pow is not constexpr
}
Once pow is changed to constexpr double pow(...), mysin can really evaluate at compile time. The mysin(30.0) in Exercise 1 is exactly this "lookup-table by compiler" pattern — once fixed, the entire sin value is computed by the compiler and baked into the binary, with O(1) runtime cost.
Don't Add constexpr Just for the Sake of It
Pushing computation to compile time also pushes error reporting and debugging information to compile time, and once the logic gets complex, compiler diagnostics can become intimidating. Rules of thumb:
- A computation that genuinely needs to appear in an array dimension / template argument / static_assert → use constexpr
- An ordinary utility function that could be constexpr but doesn't need to be → don't bother, keep the cost story simple
constexpr Is Not the Same as inline or noexcept
But here's a detail that's easy to miss: constexpr functions are implicitly inline. This means including the same constexpr function definition across multiple translation units does not violate ODR — defining it directly in a header file is fine, no extra inline needed.
III. Practice Code
Practice Topics
- 0 - Compile-time computation basics: constexpr vs const
- 1 - Applied compile-time computation: factorial / Sum / mysin auto lookup table
Practice Code Auto-detection Command
d2x checker constexpr
IV. Additional Resources
Literal Types
A literal type (LiteralType) is the C++11 named requirement for types that are allowed to participate in compile-time evaluation. It pairs with constexpr from ch07: constexpr decides "can this function or variable be evaluated at compile time", and literal type decides "what kinds of values are allowed to enter that compile-time world". C++11 also opened up user-defined literals (42_km, "abc"_s) so user types can be written with the same literal-style syntax as built-ins.
| Book | Video | Code | X |
|---|---|---|---|
| cppreference-LiteralType / cppreference-user-literal / markdown | Video Explanation | Practice Code |
Why was it introduced?
- Together with constexpr, it lets user-defined types participate in compile-time evaluation, not just built-ins like int / double
- Provides a more readable literal syntax for units, measurements, and strong-typed integers (e.g.
1_km,3_sec,42ms) - Extends the range of code that can be evaluated at compile time from built-in scalars to domain types like Vector / Point / Color
What makes a type a literal type?
- Built-in scalar types (int / double / pointer / nullptr_t / enum, ...) are literal types automatically
- Arrays: an array of literal types is itself a literal type
- User-defined types: at least one constexpr constructor (other than copy/move) + a trivial or constexpr destructor + every non-static data member is a literal type + every base class is a literal type
I. Basic Usage and Scenarios
Built-in Type Literals
Built-in scalar types are literal types out of the box, and can directly participate in compile-time computation when combined with constexpr.
constexpr char c = 'A';
constexpr int  a = 1;
constexpr double pi = 3.14;

constexpr int sum = a + 2 + 3;  // computed at compile time
Turning a User Type Into a Literal Type (Add a constexpr Constructor)
A plain Vector class as written below is not a literal type, so it cannot be used in constexpr contexts.
struct Vector {
    int x, y;
    Vector(int x_, int y_) : x(x_), y(y_) { } // ordinary constructor, not constexpr
};

constexpr Vector v{1, 2}; // error: Vector has no constexpr constructor
Marking the constructor constexpr upgrades Vector to a literal type, so it can be passed into constexpr functions and composed at compile time.
struct Vector {
    int x, y;
    constexpr Vector(int x_, int y_) : x(x_), y(y_) { } // key: constexpr ctor
};

constexpr Vector add(const Vector& a, const Vector& b) {
    return Vector(a.x + b.x, a.y + b.y);
}

constexpr Vector v1{1, 2}, v2{2, 3};
constexpr Vector v3 = add(v1, v2); // {3, 5}, computed at compile time
Literal Type + constexpr Function = Small Compile-Time Computations
Combining literal types with constexpr functions lets us move small chunks of "business logic" that used to live at runtime into compile time. Below, splitting a string into an array and summing it both happen at compile time.
constexpr std::array<int, 3> to_array(const char *str) {
    return { str[0] - '0', str[1] - '0', str[2] - '0' };
}

constexpr auto arr = to_array("123");
constexpr int sum  = arr[0] + arr[1] + arr[2]; // 6 at compile time
User-Defined Literals - operator"" _suffix
C++11 allows literals like 42_km / "abc"_s by overloading operator"" _suffix. The suffix name must start with an underscore - suffixes without an underscore are reserved for the standard library.
struct Length {
    long double meters;
};

// floating-point literal suffix: 1.5_km
constexpr Length operator"" _km(long double v) {
    return Length{ v * 1000.0L };
}

// integer literal suffix: 200_m
constexpr Length operator"" _m(unsigned long long v) {
    return Length{ static_cast<long double>(v) };
}

constexpr Length d1 = 1.5_km; // 1500 m
constexpr Length d2 = 200_m;  // 200 m
String literals can also have user-defined suffixes, e.g. a _s that builds a std::string.
std::string operator"" _s(const char* str, std::size_t len) {
    return std::string(str, len);
}

auto greet = "hello"_s; // std::string
II. Important Notes
A User-Defined Literal Suffix Must Start With an Underscore
Suffixes without a leading underscore (e.g. s, min, if) are reserved for the standard library. A user-defined literal suffix without the underscore has undefined behavior, and compilers typically warn about it directly.
// bad: no leading underscore
long double operator"" km(long double v); // warning / undefined

// good
long double operator"" _km(long double v); // ok
"Literal Type" Is Not the Same as "Compile-Time Constant"
A literal type only says the type itself is eligible to participate in constexpr - it does not mean every value of that type is known at compile time. A plain int variable is a literal type, but its value could very well come from runtime input.
int x;
std::cin >> x;        // value of x is determined at runtime
// int is still a literal type - type eligibility != value known
To actually make a value usable at compile time, mark the variable itself constexpr (or const with a compile-time initializer).
Cooked Literals vs Raw Literals
User-defined literals come in two flavors.
- cooked: the compiler first parses the literal using the built-in rules and then passes the parsed value to your operator. This is the common case -
operator"" _km(long double)receives an already-parsed floating-point value. - raw: the compiler hands you the original character sequence of the literal and lets you parse it yourself. The signature is
operator"" _suf(const char* str), useful when you need to bypass the built-in parsing (e.g. a custom big-integer parser).
// cooked: receives a long double
constexpr long double operator"" _km(long double v) { return v * 1000.0L; }

// raw: receives the literal "1500" as a string of characters
constexpr long long operator"" _bigint(const char* str) {
    long long n = 0;
    for (auto p = str; *p; ++p) n = n * 10 + (*p - '0');
    return n;
}
Destructor: Trivial in C++11, Relaxed to constexpr in C++20
C++11 requires a literal type's destructor to be trivial. That's why std::string historically wasn't a literal type - it has to free heap memory in its destructor. C++20 relaxes this rule to "the destructor may be constexpr", which is why std::string can be used in constexpr contexts starting in C++20.
// In C++11 / C++17, std::string is not a literal type
constexpr std::string s = "abc"; // error in C++17
A constexpr Constructor Cannot Be Just a Copy/Move Constructor
LiteralType requires at least one constexpr constructor that is not a copy or move constructor. In other words, putting constexpr only on the copy constructor is not enough - there must be a constexpr constructor that can build the object from raw data.
III. Practice Code
Practice Topics
- 0 - Understand the literal-type concept - what can be constexpr
- 1 - Define your own literal type - add a constexpr constructor to Vector
Practice Code Auto-detection Command
d2x checker literal-type-0
d2x checker literal-type-1
IV. Additional Resources
List Initialization
List initialization is an initialization style that uses { arg1, arg2, ... } lists (curly braces) to initialize objects, and can be used in almost all object initialization scenarios, hence it's often called uniform initialization. Additionally, it adds type checking for list members to prevent narrowing issues.
| Book | Video | Code | X |
|---|---|---|---|
| cppreference / markdown | Video Explanation | Practice Code |
Why was it introduced?
- Solve the problem of inconsistent initialization syntax styles
- Prevent narrowing issues caused by implicit conversions
- Facilitate container type initialization
- Resolve default initialization syntax pitfalls
I. Basic Usage and Scenarios
Uniform Initialization Style
Before C++11, different scenarios had different initialization methods:
int a = 5;              // Copy initialization
int b(5);               // Direct initialization
int arr[3] = {1, 2, 3}; // Array initialization
Object obj1;            // Default construction
Object obj2(obj1);      // Copy construction
They can be unified in style using { }:
int a = { 5 };              // Copy initialization
int b { 5 };                // Direct initialization
int arr[3] = {1, 2, 3};     // Array initialization
Object obj1 { };            // Default initialization
Object obj2 { obj1 };       // Copy construction
Avoid Implicit Type Conversion and Narrowing Issues
Traditional initialization methods generally follow the C language implicit type conversion rules. For example, when initializing an int type variable with a double type, the decimal part is automatically discarded. List initialization adds additional compile-time type checking to avoid implicit type conversions and precision loss issues. In modern C++, unless intentional implicit type conversion is needed, using list initialization is generally a better choice.
int a = 3.3; // ok
int a = { 3.3 }; // error

constexpr double b { 3.3 }; // ok
int c(b); // ok -> 3
int c { b }; // error: type mismatch
Narrowing checks in array initialization:
int arr[] { 1, 2, 3.3, 4 }; // error: 3.3 causes narrowing
int arr[] = { 1, 2, b, 4 }; // error: b causes narrowing
Note: If b is a runtime variable, the compiler might only trigger narrowing warnings instead of errors.
Improve Container Initialization Conciseness
For container type initialization, old C++ often required two steps. First, create an element array; second, use this array to initialize the container.
int arr[5] = {1, 2, 3, 4, 5};
std::vector<int> v(arr, arr + sizeof(arr) / sizeof(int));
The introduction of list initialization allows us to combine these two steps into one, significantly improving container initialization conciseness.
std::vector<int> v1 {1, 2, 3};
std::vector<int> v2 {1, 2, 3, 4, 3};
Moreover, through std::initializer_list, our custom types can also support this variable-length list initialization style.
class MyVector {
public:
    MyVector() = default;
    MyVector(std::initializer_list<int> list) {
        for (auto it = list.begin(); it != list.end(); it++) {
            // *it ...
        }
    }
};
MyVector v1 {1, 2, 3};
MyVector v2 {1, 2, 3, 4, 3};
Avoid Initialization Syntax Pitfalls
Using { } to call default constructors avoids syntax pitfalls.
#include <iostream>

struct Object {
    Object() { std::cout << "Constructor called!" << std::endl; }
};

int main() {
    Object obj1 { };
    Object obj2(); // obj2 is a function, not an Object instance
}
II. Important Notes
Array Type List Initialization
The values in array type definitions are generally indeterminate, but list initialization performs default value initialization and supports automatic zero-padding.
Regular arrays:
int arr[4];          // arr[0] indeterminate
int arr[4] { };      // arr[0] = 0
int arr[4] { 1, 2 }; // arr[2] / arr[3] automatically padded to 0
Array containers:
std::array<int, 4> arr;     // arr[0] indeterminate/may be random value
std::array<int, 4> arr { }; // arr[0] == 0
std::array<int, 4> arr { 1, 2 }; // arr[0] == 1, arr[2] automatically padded to 0
Member Initialization Issues
List initialization supports direct initialization of aggregate type members, but note that after adding constructors, they must match the constructor.
struct Point {
    int x, y;
    // Point(int x, int y) { ... }
};
Point { 1, 2 };
Point p1 { 2, 3 }; // p1 { x: 2, y: 3}
Prefer std::initializer_list Constructors
class MyVector {
public:
    MyVector() = default;
    MyVector(int x, int y) {  }
    MyVector(std::initializer_list<int> list) {
        for (auto it = list.begin(); it != list.end(); it++) {
            // *it ...
        }
    }
};
MyVector v1 { 1, 2 }; // Prefers MyVector(std::initializer_list<int> list)
MyVector v1(1, 2); // Matches MyVector(int x, int y)
III. Additional Resources
Delegating Constructors
Delegating constructors are syntactic sugar introduced in C++11. Through simple syntax, they can avoid writing excessive repetitive code and achieve constructor logic reuse without affecting performance.
| Book | Video | Code | X |
|---|---|---|---|
| cppreference / markdown | Video Explanation | Practice Code |
Why was it introduced?
- Avoid writing repetitive code in constructor overloading
- Facilitate code maintenance
I. Basic Usage and Scenarios
Reusing Constructor Logic
When a class needs to write overloaded constructors, it's easy to end up with a lot of repetitive code, for example:
class Account {
    string id;
    string name;
    string coin;
public:

    Account(string id_) {
        id = id_;
        name = "momo";
        coin = "0元";
    }

    Account(string id_, string name_) {
        id = id_;
        name = name_;
        coin = "0元";
    }

    Account(string id_, string name_, int coin_) {
        id = id_;
        name = name_;
        coin = std::to_string(coin_) + "元";
    }
};
The initialization code in these 3 constructors is clearly repetitive (actual initialization might be more complex). With delegating constructor support, by using : Account(xxx) in the constructor member initialization list to delegate to other more complete constructors, we can keep only one copy of the code.
class Account {
    string id;
    string name;
    string coin;
public:

    Account(string id_) : Account(id_, "momo") { }

    Account(string id_, string name_) : Account(id_, name_, 0) { }

    Account(string id_, string name_, int coin_) {
        id = id_;
        name = name_;
        coin = std::to_string(coin_) + "元";
    }
};
The above two constructors, through delegation, will ultimately forward to Account(string id_, string name_, int coin_).
Why is it easier to maintain?
Suppose if the currency unit or name needs to be modified, the repetitive code implementation not only violates the reuse principle but also requires multiple modifications when changing constructor logic, increasing maintenance costs.
With delegating constructors, the constructor logic is placed in one location, making modifications and maintenance more convenient.
For example, if we need to change 元 to 原石, we only need to modify it once:
class Account {
    // ...
    Account(string id_, string name_, int coin_) {
        //...
        //coin = std::to_string(coin_) + "元";
        coin = std::to_string(coin_) + "原石";
    }
};
Difference from encapsulating in an init function
Some might think: if we write the constructor logic as an init function, wouldn't that also achieve code reuse? Why add a new syntax as a feature to the standard? Isn't it redundant and making C++ more complex?
class Account {
    // ...

    init(string id_, string name_, int coin_) {
        id = id_;
        name = name_;
        coin = std::to_string(coin_) + "元";
    }

public:

    Account(string id_) { init(id_, "momo", 0); }

    Account(string id_, string name_) { init(id_, name_, 0); }

    Account(string id_, string name_, int coin_) {
        init(id_, name_, coin_);
    }
};
Actually, from a performance perspective, in most cases, separately encapsulating an init function has lower performance than delegating constructors. Because member construction generally goes through two stages:
- Step 1: Execute default initialization or member initialization list
- Step 2: Run constructor logic in the constructor body
class Account {
    // ...
public:

    Account(string id_, string name_, int coin_)
        /* : 1 - member initialization list */
    {
        // 2 - execute constructor function body
        init(id_, name_, coin_);
    }
};
This causes members to be "initialized" twice when using an init function, while delegating constructors can avoid this problem through the member initialization list:
class Account {
    // ...
public:

    Account(string id_, string name_, int coin_)
        : id { id_ }, name { name_ }, coin { std::to_string(coin_) + "元" }
    {
        // ...
    }
};
II. Important Notes
Temporary Object Misunderstanding
In scenarios not using delegating constructors, calling another constructor within a constructor body actually just creates a temporary object:
- Calling a normal function
init: initializes this object's members - Calling another constructor: creates a new temporary object outside this object
class Account {
    // ...
public:

    Account(string id_, string name_) {
        Account(id_, name_, 0); // creates a temporary object
        // init(id_, name_, 0);
        // this->Account(id_, name_, 0); // error
    }

    Account(string id_, string name_, int coin_) {
        id = id_;
        name = name_;
        coin = std::to_string(coin_) + "元";
    }
};
Cannot Reinitialize
When using delegating constructors, you cannot use the initialization list to initialize other members. This restriction avoids repeated initialization and ensures data members are only initialized once.
For example, if the following syntax were allowed, coin would be initialized multiple times and could cause ambiguity:
class Account {
    // ...
public:

    Account(string id_)
        : Account(id_, "momo"), coin { "0元" } // error
    {

    }

};
III. Additional Resources
Inherited Constructors
Inherited constructors are a syntactic feature introduced in C++11 that solves the tedious problem of derived classes repeatedly defining base class constructors in class inheritance structures.
| Book | Video | Code | X |
|---|---|---|---|
| cppreference / markdown | Bili / Youtube | Practice Code |
Why was it introduced?
- Reduce repetitive code, avoid manual forwarding
- Improve code expressiveness
I. Basic Usage and Scenarios
Reusing Base Class Constructors
Before the inherited constructors feature was introduced, even when base and derived class constructors had identical forms, they still needed to be redefined. This not only caused code duplication but also lacked conciseness. For example, in the following code, MyObject reimplements each constructor from Base:
class ObjectBase {
    //...
public:
    ObjectBase(int) {}
    ObjectBase(double) {}
};

class MyObject : public ObjectBase {
public:
    MyObject(int x) : ObjectBase(x) {}
    MyObject(double y) : ObjectBase(y) {}
    //...
};
With this feature, you can directly inherit constructors from the base class using using ObjectBase::ObjectBase;, avoiding this manual forwarding process:
class MyObject : public ObjectBase {
public:
    using ObjectBase::ObjectBase;
    //...
};
It's important to note that constructor inheritance during compile-time implicit code generation is not just a "simple" copy of constructors, but also has an effect similar to "automatic renaming" in the derived class (ObjectBase -> MyObject). That is:
class MyObject : public ObjectBase {
public:
    // Possible generated code
    MyObject(int x) : ObjectBase(x) {}
    MyObject(double y) : ObjectBase(y) {}
};
Type Functionality Extension
In many special scenarios, we might want to add additional behavior/methods to a type without changing its construction behavior. This is where inherited constructors can be used:
class ObjectXXX : public Object {
public:
    using Object::Object;

    void your_method() { /* ... */ }
};
When testing or debugging certain types, we often wish to use interfaces like to_string(). If modifying the source code directly is inconvenient, we can use the inherited constructors feature to create a new type with "the same interface" and add some convenient debugging interface functions, thus achieving indirect testing with more convenient debugging functions. For example, consider this Student class:
class Student {
protected:
    //...
    double score;
public:
    string id;
    string name;
    uint age;

    Student(string id, string name);
    Student(string id, string name, uint age);
    Student(string id, ...);
};
By implementing StudentDebug and adding some helper functions, it becomes easier to obtain debugging information:
class StudentDebug : public Student {
public:
    using Student::Student;

    std::string to_string() const {
        return "{ id: " + id + ", name: " + name
            + ", age: " + std::to_string(age) + " }";
    }

    void dump() const { /* some score details ... */ }
    void assert_valid() const {
        assert(score >= 0 && score <= 100);
        // ...
    }
};
When using StudentDebug, both object creation and original method usage remain consistent with Student. Therefore, for requirements that only add behavior without changing the original type's object construction form, using inherited constructors can greatly simplify code.
Note: Generally, this approach can maintain the same object construction + behavior/method invocation form as the base class. However, it doesn't necessarily have the same memory layout (e.g., adding virtual methods), and type judgment (RTTI) is not equal.
Exception or Error Type Identification and Forwarding
In error and exception handling, we can define only a basic error type:
class ErrorBase {
public:
    ErrorBase() { }
    ErrorBase(const char *) { }
    ErrorBase(std::string) { }
    //...
};
When defining error types for multiple identification scenarios, using inherited constructors easily allows them to maintain the same construction form as the base error type. For example:
class ConfigError : public ErrorBase {
public:
    using ErrorBase::ErrorBase;
};

class RuntimeError : public ErrorBase {
public:
    using ErrorBase::ErrorBase;
};

class IoError : public ErrorBase {
public:
    using ErrorBase::ErrorBase;
};
Each scenario's error corresponds to an error type, not only maintaining unified error object construction but also being well-suited for automatic error type forwarding and processing with C++'s overloading mechanism. For example, we can implement corresponding processing functions for each error type, and types without implementations will use the base type's processing function, similar to exception catching and handling designs in many programming languages. For example, a custom error processor:
struct MyErrProcessor {
    static void process(ErrorBase err) { /* base processing */ }
    static void process(ConfigError err) { /* config error processing */ }
    // ...
};

MyErrProcessor::process(errObj); // Automatically matches corresponding error processing function
Generic Decorators and Behavior Constraints
Inherited constructors can be used not only in ordinary inheritance but also in template types. For example, in the following NoCopy definition, using T::T is used to inherit constructors from generic type T. Its purpose is to apply certain behavior constraints without changing the target object's construction form and usage interface:
template <typename T>
class NoCopy : public T {
public:
    using T::T;

    NoCopy(const NoCopy&) = delete;
    NoCopy& operator=(const NoCopy&) = delete;
    // ...
};
In some modules or scenarios, when we want objects to not be created by copying after initial creation, we can use this NoCopy decorator/wrapper during definition. The wrapper's delete explicitly tells the compiler to delete copy construction and copy assignment, meaning the object no longer has copy semantics. For example:
class Point {
    double mX, mY;
public:
    Point() : mX { 0 }, mY { 0 } { }
    Point(double x, double y) : mX { x }, mY { y } { }

    string to_string() const {
        return "{ " + std::to_string(mX)
            + ", " + std::to_string(mY) + " }";
    }
};

Point p1(1, 2);
NoCopy<Point> p2(2, 3);
In this case, both p1 and p2 have the same interface usage, but p2 lacks the copyable property compared to p1:
p1.to_string(); // ok
p2.to_string(); // ok

auto p3 = p1; // ok (copy construction)
auto p4 = p2; // error (cannot copy)
II. Important Notes
Prefer Inheritance or Composition
Since this chapter introduces the inherited constructors feature and usage, it's bound to the inheritance nature. Therefore, implementation-wise, it tends to use inheritance. However, considering the target functionality, both inheritance and composition can often achieve the goal; they are more like means rather than ends, so the choice should be based on specific application scenarios.
For example, for testing environments or scenarios involving only functional extension without data structure changes, using inheritance with inherited constructors is more convenient and can avoid extensive function forwarding. However, for scenarios requiring "interception" of specific interfaces or more complex situations, the mainstream approach (as of 2025) tends to prefer composition over inheritance.
- Complex scenarios or requiring an intermediate layer for special processing -> generally composition is better than inheritance
- Simple functional extension requiring consistent interface usage -> generally inheritance is better than composition
III. Practice Code
Practice Code Topics
- 0 - Familiarize with Inherited Constructors Feature
- 1 - Application in Functional Extension - StudentTest
- 2 - Application in Generic Templates - NoCopy / NoMove Behavior Constraints
Practice Code Auto-detection Command
d2x checker inherited-constructors
IV. Additional Resources
nullptr - Pointer Literal
nullptr is a pointer literal introduced in C++11, used to represent null pointers. It addresses the shortcomings of traditional null pointer representations (such as NULL and 0) in terms of type safety and overload resolution.
| Book | Video | Code | X |
|---|---|---|---|
| cppreference / markdown | Video Explanation | Practice Code |
Why was it introduced?
- Resolve ambiguity issues with
NULLmacro and integer0in overload resolution - Provide type-safe null pointer representation
- Clearly distinguish between pointer and integer types
- Support type deduction in template programming
What's the difference between nullptr and NULL?
nullptris a keyword introduced in C++11, with typestd::nullptr_tNULLis a preprocessor macro, typically defined as integer0or(void*)0nullptris more precise in overload resolution and won't be confused with integer types
I. Basic Usage and Scenarios
Replacing NULL and 0
Used for pointer variable initialization and assignment, replacing traditional
NULLand0
int* ptr1 = nullptr;        // Recommended usage
int* ptr2 = NULL;           // Traditional usage
int* ptr3 = 0;              // Not recommended

// Check if pointer is null
if (ptr1 == nullptr) {
    // Handle null pointer case
}
Resolving Overload Ambiguity
Explicitly passing null pointers in function calls,
nullptrcan avoid overload ambiguity issues and prevent confusion with integer types
void func(int* ptr) {
    if (ptr != nullptr) {
        *ptr = 42;
    }
}

void func(int value) {
    // Handle integer parameter
}

int main() {
    func(nullptr);  // Explicitly call pointer version
    func(0);        // May call integer version, causing ambiguity
    func(NULL);     // May call integer version, causing ambiguity
}
For example, in the code above, calling func(NULL) will report an overload ambiguity error
main.cpp: In function 'int main()':
main.cpp:16:9: error: call of overloaded 'func(NULL)' is ambiguous
   16 |     func(NULL);     // May call integer version, causing ambiguity
      |     ~~~~^~~~~~
Ensuring Type Safety in Template Programming
In template functions and classes,
nullptrprovides better type deduction and safety
// https://en.cppreference.com/w/cpp/language/nullptr.html

template<class T>
constexpr T clone(const T& t) {
    return t;
}

void g(int*) {
    std::cout << "Function g called\n";
}

int main() {
    g(nullptr);        // ok
    g(NULL);           // ok
    g(0);              // ok

    g(clone(nullptr)); // ok
    g(clone(NULL));    // ERROR: NULL might be deduced to non-"pointer" type
    g(clone(0));       // ERROR: 0 will be deduced to non-"pointer" type
}
When using function templates, NULL and 0 are usually deduced to non-"pointer" types, while nullptr can avoid this problem
main.cpp:19:12: error: invalid conversion from 'int' to 'int*' [-fpermissive]
   19 |     g(clone(0));       // ERROR: 0 will be deduced to non-"pointer" type
      |       ~~~~~^~~
      |            |
      |            int
Smart Pointers and Containers
Used with modern C++ features (such as smart pointers, STL containers)
#include <memory>
#include <vector>

int main() {
    std::shared_ptr<int> sp1 = nullptr;
    std::unique_ptr<int> up1 = nullptr;

    std::vector<int*> vec;
    vec.push_back(nullptr);

    // Check if smart pointer is null
    if (sp1 == nullptr) {
        sp1 = std::make_shared<int>(42);
    }
}
II. Important Notes
Type Deduction and std::nullptr_t
The type of nullptr is std::nullptr_t, which is a special type that can be implicitly converted to any pointer type:
#include <cstddef>  // Contains definition of std::nullptr_t

void func(int*) {}
void func(double*) {}
void func(std::nullptr_t) {}

int main() {
    auto ptr = nullptr;  // ptr's type is std::nullptr_t

    func(nullptr);       // Call std::nullptr_t version
    func(ptr);           // Call std::nullptr_t version

    int* intPtr = nullptr;
    func(intPtr);        // Call int* version
}
Implicit Conversion to Boolean Type
nullptr can be implicitly converted to bool type, which is very convenient in conditional checks:
int* ptr = nullptr;

if (ptr) { // Equivalent to if (ptr != nullptr)
    // Pointer is not null
} else {
    // Pointer is null
}

bool isEmpty = (ptr == nullptr);  // true
III. Practice Code
Practice Code Topics
- 0 - nullptr Basic Usage
- 1 - nullptr Function Overloading
- 2 - nullptr Advantages in Template Programming
Auto-Checker Command
d2x checker nullptr
IV. Additional Resources
long long - 64-bit Integer Type
long long is a 64-bit integer type introduced in C++11, used to represent larger range integer values. It solves the range limitation issues of traditional integer types when representing large integers.
| Book | Video | Code | X |
|---|---|---|---|
| cppreference / markdown | Video Explanation | Practice Code |
Why was it introduced?
- Solve the insufficient range of traditional integer types
- Provide a unified 64-bit integer type standard
What's the difference between long long and traditional integer types?
long longguarantees at least 64-bit width, with range at least from -2^63 to 2^63-1intis typically 32-bit, with range approximately -2.1 billion to 2.1 billionlongis 32-bit on 32-bit systems, typically 64-bit on 64-bit systems (but standard only guarantees at least 32-bit)
I. Basic Usage and Scenarios
Basic Declaration and Initialization
Support for signed and unsigned versions, with literal suffixes
// Signed long long
long long val1 = 1;
long long val2 = -1;

// Unsigned long long
unsigned long long uVal1 = 1;

// Literal identifiers + type deduction
auto longlong = 1LL;
auto ulonglong = 1ULL;
Large Integer Applications and Boundary Values
Handle calculations beyond traditional integer type ranges, based on boundary value acquisition
//#include <limits>

// Using long long for large number calculations (exceeding int range)
long long population = 7800000000LL;  // World population

// Get integer type boundaries
int maxInt = std::numeric_limits<int>::max();
long long maxLL = std::numeric_limits<long long>::max();
auto minLL = std::numeric_limits<long long>::min();
II. Important Notes
Type Deduction and Literal Suffixes
Use LL or ll suffix to explicitly specify long long literals, use ULL or ull to specify unsigned versions
auto num1 = 10000000000;    // Type may be int or long, depending on compiler
auto num2 = 10000000000LL;  // Explicitly long long to assist type deduction
Type Conversion and Precision Issues
Be aware of precision loss that may occur during conversions between different integer types
long long bigValue = 3000000000LL;
int smallValue = bigValue;  // May overflow

std::cout << "bigValue: " << bigValue << std::endl;
std::cout << "smallValue: " << smallValue << std::endl;  // May be incorrect

// Safe conversion check
if (bigValue > std::numeric_limits<int>::max() || bigValue < std::numeric_limits<int>::min()) {
    std::cout << "Conversion would cause overflow!" << std::endl;
}
Bit-Width Confusion - Why Doesn't the Standard Fix the Bit Width?
Reasons
- Hardware Variations: Different architectures have different "natural word sizes," such as 16/32/64 bits, and many embedded systems only support 8/16-bit multiplication and division instructions. If
longwere forcibly defined as 64 bits, it would cause significant performance issues on some machines (e.g., 32-bit MCUs).- For example: Performing 64-bit calculations on an 8-bit machine without relevant hardware instructions would require algorithmic simulation, leading to a sharp increase in
instruction cycles.
- For example: Performing 64-bit calculations on an 8-bit machine without relevant hardware instructions would require algorithmic simulation, leading to a sharp increase in
- Historical and ABI Compatibility: C/C++ predates the widespread adoption of modern 32/64-bit systems. Many platforms have system interfaces, file formats, and calling conventions that have already encoded the size of
int/longinto their ABI. Forcing a change in the standard would break binary compatibility and disrupt the ecosystem. - Zero-Cost Abstraction: The C/C++ standard is designed to map efficiently to the underlying hardware. It only specifies behavior and minimum ranges, allowing implementations to choose the most natural width for the platform, thereby achieving zero-cost or near-zero-cost abstraction.
Solutions
- Optional Fixed-Width Types in C/C++: When precise bit widths are required, use types from
<cstdint>/<stdint.h>such asint8_t,int16_t,int32_t,int64_t, etc. - Avoid Bit-Width Assumptions and Use Static Assertions: Avoid assuming the bit width of types during development to improve portability. If certain code relies on specific bit-width assumptions, use static assertions to ensure the width meets expectations:
static_assert(sizeof(T) == N).
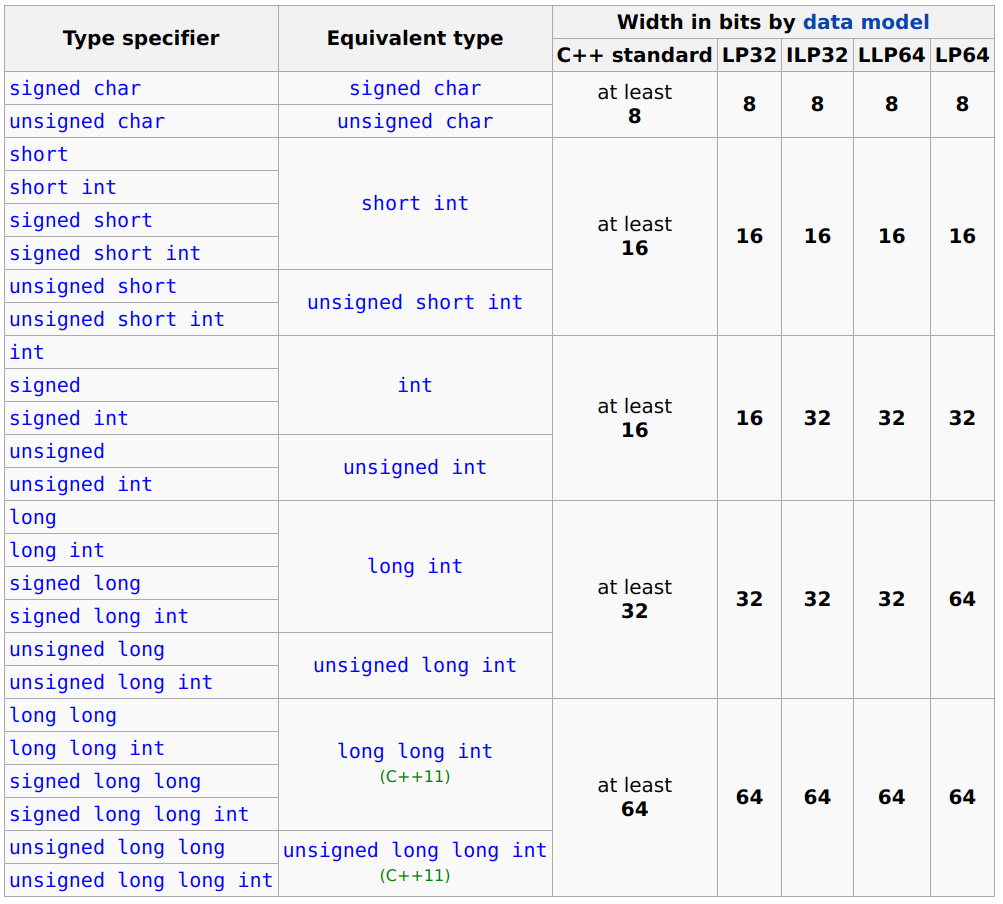
III. Practice Code
Practice Code Topics
Auto-Checker Command
d2x checker long-long
IV. Additional Resources
Type alias and alias template
Type alias and alias template are important features introduced in C++11, used to create new names for existing types, enhancing the expressive power of generic programming, and improving code readability and maintainability.
| Book | Video | Code | X |
|---|---|---|---|
| cppreference-type-alias / markdown | Video Explanation | Exercise Code |
Note: The
usingkeyword existed before C++11, but was mainly used for namespace and class member declarations
- Declaring namespaces:
using namespace std;- Class member declarations:
struct B : A { using A::member; };
Why introduced?
- Replace traditional
typedefsyntax with a more intuitive way to define type aliases - Support template aliases, enhancing the expressive power of generic programming
- Improve code readability, especially for complex types
- Consistent with
usingdeclaration syntax
What's the difference between type alias and typedef?
- More intuitive syntax:
using NewType = OldType;vstypedef OldType NewType; - Support template aliases, while
typedefdoes not - More flexible and powerful in template programming
I. Basic Usage and Scenarios
Basic Type Alias
Create new names for existing types to improve code readability, and can replace traditional
typedefalias definitions
typedef int Integer; // Traditional typedef way
using Integer = int; // C++11 using way

// Using aliases
Integer i = 1;
int j = 2;
Type alias is not a new type, but an alias for other composite types, essentially the same. In the above code, the essence of Integer is int, commonly used to simplify type names.
Complex Type Alias
Create aliases for complex types (such as function pointers, nested types)
// Function pointer alias
using FuncPtr = void(*)(int, int);
using StringVector = std::vector<std::string>;

// Nested type alias
struct Container {
    using ValueType = int;
    using Iterator = std::vector<ValueType>::iterator;
};

void example(int a, int b) {
    // Function implementation
}

int main() {
    FuncPtr func = example; // Equivalent: void(*func)(int, int) = example;
    StringVector strings = {"hello", "world"}; // Equivalent: std::vector<std::string> strings...
    Container::ValueType value = 100; // Equivalent: int value = 100;
    return 0;
}
For code like void (*func)(int, int) = example;, many people might hesitate before understanding it defines a function pointer. By using using to give complex types a type alias FuncPtr, using FuncPtr func = example; allows people to quickly understand the code's intent.
Alias Template
Create aliases for template types, enhancing generic programming capabilities
// Alias template
template <typename T>
using Vec = std::vector<T>;

// Create "subset" alias types based on generics
template <typename T>
using Vec3 = std::array<T, 3>;
template <typename T>
using Vec4 = std::array<T, 4>;

// Alias template with default parameters
template <typename T, typename Compare = std::less<T>>
using Heap = std::priority_queue<T, std::vector<T>, Compare>;

int main() {
    Vec<int> numbers = {1, 2, 3};
    Vec3<float> v3 = {1.0f, 2.0f, 3.0f};
    Vec4<float> v4 = {1.0f, 2.0f, 3.0f, 4.0f};
    Heap<int> minHeap;
    Heap<int, std::greater<int>> maxHeap;
    return 0;
}
In addition to creating aliases for complex types, it also supports creating aliases for template types, and through template parameters, it can control the parameters/properties of the original template type - default parameters, allocator types, length, comparators, etc. In the above code, we created dynamic Vec type aliases; also created fixed-length Vec3, Vec4 type aliases for special scenarios (vector, matrix calculations) by specifying length; and used template parameter defaults to create Heap type, using vector as the underlying data structure by default, supporting default min-heap, and setting max-heap by specifying template parameters.
Standard Library _t Style Templates
In STL, some templates provide _t versions to save the process of manually obtaining types and values. Type aliases can easily implement them. _v style suuport by
c++ 17[inline variables + variable templates]
Reference implementation of std::remove_const_t
// Implementation and principle explanation of remove_const can refer to: https://zhuanlan.zhihu.com/p/352972564
template <typename T>
using my_remove_const_t = typename std::remove_const<T>::type;

int main() {
    const int a = 10;
    my_remove_const_t<decltype(a)> b = a; // b's type is int, not const int
    return 0;
}
II. Precautions
Alias is Not a New Type
Type alias is just a synonym for existing types and does not create new types
using MyInt = int;
using YourInt = int;

int main() {
    MyInt a = 10;
    YourInt b = 20;

    a = b;  // Can assign because both are int types
    static_assert(std::is_same<MyInt, YourInt>::value, "Types are the same");

    return 0;
}
Scope of Template Aliases
Alias templates must be declared at class scope or namespace scope
namespace MyNamespace {
    template<typename T>
    using MyVector = std::vector<T>;
}

class MyClass {
public:
    template<typename T>
    using Ptr = T*;
};

// Error: cannot declare alias template in function scope
// void func() {
//     template<typename T>
//     using LocalAlias = T;  // Compilation error
// }
Recursive Alias Restrictions
Alias templates cannot directly or indirectly reference themselves
template<typename T>
struct A;

// Error: recursive alias
// template<typename T>
// using B = typename A<T>::U;

template<typename T>
struct A {
    // typedef B<T> U;  // This will cause recursive definition error
};
III. Exercise Code
Exercise Code Topics
- 0 - Basic Type Alias
- 1 - Complex Types and Function Pointer Aliases
- 2 - Alias Template Basics
- 3 - Alias Template Applications in Standard Library
Exercise Code Auto-Check Command
d2x checker type-alias
IV. Other
Variadic Templates
Variadic templates are a core template feature introduced in C++11. They allow function templates and class templates to take any number of arguments of any type, giving C++ the first type-safe and compile-time-checkable way to write printf-style multi-argument interfaces.
| Book | Video | Code | X |
|---|---|---|---|
| cppreference / markdown | Video Explanation | Practice Code |
Why was it introduced?
- Before C++11, handling an arbitrary number of arguments forced you to either rely on C-style variadic macros (
.../__VA_ARGS__) or hand-roll many overloads / macro-generated templates — neither was type-safe or maintainable - The standard library needed a uniform mechanism to implement variadic components such as
make_shared,tuple, andfunction - Combined with rvalue references and perfect forwarding, variadic templates make truly "generic, zero-overhead" forwarding interfaces possible
How does it differ from C-style variadics or hand-coded template overloads?
- Variadic macros (
__VA_ARGS__) are pure text substitution: no type information and no way to iterate the arguments at runtime — one wrong format specifier and it crashes - Hand-coded template overloads (a separate version for 1, 2, 3, ..., N arguments) are extremely repetitive, hard to extend, and usually need macros to bulk-generate them
- Variadic templates expand parameter packs at compile time, fully preserving each argument's type / value category / cv-qualification, and integrate with
std::forwardfor perfect forwarding
I. Basic Usage and Scenarios
Historical Context - Pre-C++11 Approaches
Before C++11, "any-number-of-arguments" was handled with variadic macros or template overloads + macro generation. Both have obvious shortcomings — the comparison below uses an arbitrary-argument output function as the running example.
Variadic Macros
Inherited from C: ... declares the variadic part of the macro and __VA_ARGS__ accesses the actual arguments.
#define LOG(fmt, ...)  printf(fmt, __VA_ARGS__)

LOG("x = %d, y = %f\n", 10, 3.14); // expands to printf("x = %d, y = %f\n", 10, 3.14);
LOG("Hello");                       // expands to printf("Hello");
Easy to write but very limited, and hard to combine with modern C++:
- No type-safety checking
LOG("%s", 42); // compiles, but crashes or prints garbage at runtime
- Can't deal with references / move semantics, can't store the pack
- Can't iterate
__VA_ARGS__and apply different operations per argument
Template Overloads + Hard-Coding
The most direct and most clumsy approach — write one overload per arity (1, 2, 3, ..., N). Extremely repetitive and hard to maintain.
Macros Generating Templates
A trick used heavily in Boost.Preprocessor — let the preprocessor generate template<typename T1> void print(T1), template<typename T1, typename T2> void print(T1, T2), ... overloads.
#define TP_PARAM(n)    typename T##n
#define FN_PARAM(n)    T##n p##n
#define PRINT_BODY(n)  std::cout << p##n << " ";

#define REPEAT_TP_3     typename T1, typename T2, typename T3
#define REPEAT_FN_3     T1 p1, T2 p2, T3 p3
#define REPEAT_PRINT_3  PRINT_BODY(1) PRINT_BODY(2) PRINT_BODY(3)

#define DEFINE_LOG_FUNCTION(n) \
    template<REPEAT_TP_##n> \
    void log(REPEAT_FN_##n) { REPEAT_PRINT_##n std::cout << std::endl; }

DEFINE_LOG_FUNCTION(3)
// expands to:
// template <typename T1, typename T2, typename T3>
// void log(T1 p1, T2 p2, T3 p3) {
//     std::cout << p1 << " "; std::cout << p2 << " "; std::cout << p3 << " ";
//     std::cout << std::endl;
// }
It scales poorly, compiles slowly, and is painful to debug — exactly the problem variadic templates were meant to solve.
Template Parameter Packs and Function Parameter Packs
C++11 uses ... inside templates to denote a parameter pack. The classic print example:
// recursion terminator
void print() { std::cout << std::endl; }

// pack-expanding template
template<typename T, typename... Args>
void print(T first, Args... args) {
    std::cout << first << " ";
    print(args...); // recursive call, peel off one argument each time
}

// print(1, "Hello", 3.14, 'A'); // works perfectly, type-safe
... shows up in three positions with three different meanings:
template<typename T, typename... Args>— modifiestypename, declaring a template parameter pack (variable types)void print(T first, Args... args)— modifiesArgs, declaring a function parameter pack (variable parameter list)print(args...)— modifies the parameter name, performing pack expansion at the call site
Pack Expansion - Recursive Peel-Off
C++11 has no direct syntax to iterate a pack. The standard idiom is recursion: each instantiation peels off one argument, then forwards the rest. The terminator is usually a same-name non-template function (overload resolution prefers non-templates) or a single-argument template specialization.
// terminator: single-argument version
template<typename T>
T sum(T x) { return x; }

// expansion: multi-argument version
template<typename T, typename... Args>
T sum(T first, Args... args) {
    return first + sum(args...);
}
Combining with Perfect Forwarding - make_shared
Variadic templates really shine combined with universal references and perfect forwarding, allowing arbitrary arguments to flow through to a target constructor untouched. std::make_shared in the standard library is the textbook example.
template <typename T, typename... Args>
std::shared_ptr<T> make_shared(Args&&... args) {
    T* ptr = new T(std::forward<Args>(args)...);
    return std::shared_ptr<T>(ptr);
}
Args&&... is a "pack-form universal reference", and std::forward<Args>(args)... expands so that each element of the pack gets its own std::forward, preserving every argument's lvalue/rvalue category.
sizeof... and C++14's index_sequence
C++14 added no new variadic syntax, but std::index_sequence / std::make_index_sequence enable non-recursive pack expansion: generate 0, 1, ..., N-1 at compile time, then expand the pack in a single template instantiation.
template <typename T, std::size_t... Is>
void print_impl(T&& t, std::index_sequence<Is...>) {
    // expand the pack via comma expression + braced init-list, print one by one
    using expander = int[];
    (void)expander{ 0,
        ((std::cout << "Arg " << Is << ": "
                    << std::get<Is>(std::forward<T>(t)) << '\n'), 0)... };
}

template <typename... Args>
void print_args(Args&&... args) {
    auto t = std::make_tuple(std::forward<Args>(args)...);
    print_impl(t, std::make_index_sequence<sizeof...(Args)>{});
}
sizeof...(Args) returns the count of elements in the pack and is essentially required equipment when writing variadic templates.
C++17 Fold Expressions - Replacing Recursion
C++17 introduced fold expressions, swapping recursive expansion for a much more direct syntax: apply a binary operator across the whole pack in a single expression, eliminating most boilerplate. There are four shapes:
- Unary left fold:
(... op pack)—((p1 op p2) op p3) op ... - Unary right fold:
(pack op ...)—p1 op (p2 op (p3 op ...)) - Binary left fold:
(init op ... op pack)— adds an initial value - Binary right fold:
(pack op ... op init)
// unary right fold - sum
template <typename... Args>
auto sum(Args... args) { return (args + ...); }

// unary left fold - subtraction (mind evaluation order)
template <typename... Args>
auto sub(Args... args) { return (... - args); }

// binary left fold - subtraction with init: (((init - a1) - a2) - ... - aN)
template<typename T, typename... Args>
auto sub_with_init_left(T init, Args... args) { return (init - ... - args); }
Combined with if constexpr, you can branch on the pack at compile time and skip the dedicated empty terminator entirely.
template<typename T, typename... Args>
void process_args(T first_arg, Args... rest_args) {
    process_value(first_arg);
    if constexpr (sizeof...(rest_args) > 0) { // compile-time check
        process_args(rest_args...);
    }
}
II. Important Notes
The Terminator Must Be Visible Beforehand
C++11-style recursive expansion relies on overload resolution to choose between "keep recursing" and "stop". The terminator (zero-argument or single-argument version) must be visible before the recursive template, otherwise you'll hit a no-matching-overload compile error.
Template Recursion Depth Is Bounded
Every peeled argument is one more template instantiation. Compilers default to a depth limit around 1024 (raisable via -ftemplate-depth=N). For deeply nested or very wide expansions, prefer index_sequence or C++17 fold expressions — both are flatter and faster.
Perfect-Forwarding a Pack Has a Fixed Spelling
A pack-form universal reference must be written Args&&... args, and forwarding must be written std::forward<Args>(args)... — the entire forward<Args>(args) is the pattern, and the trailing ... expands once per element. Writing std::forward<Args...>(args...) is a common bug.
A Pack Cannot Be "Saved" Directly
A parameter pack is not a first-class value — you can't assign it to a variable for later use. The standard workaround is to pack it into a std::tuple and consume it later via std::index_sequence.
template <typename... Args>
auto save(Args&&... args) {
    return std::make_tuple(std::forward<Args>(args)...); // pack into a tuple
}
Prefer C++17 Fold Expressions / Standard Library Helpers
If your project allows C++17, new code should prefer fold expressions + if constexpr over the "terminator + recursion" boilerplate. C++11-style recursive expansion is mostly relevant for maintaining legacy code or projects locked to C++11.
III. Practice Code
Practice Topics
Practice Code Auto-detection Command
d2x checker variadic-templates
IV. Additional Resources
Generalized Unions
C++11 introduced generalized (non-trivial) unions.
Union members share memory. The size of a union is at least large enough to hold the largest data member.
| Book | Video | Code | X |
|---|---|---|---|
| cppreference-union / markdown | Video Explanation | Exercise Code |
Why introduced?
- Can directly hold objects like std::string, without needing pointers.
- Better management of member lifetimes.
How Current Unions Differ from Before?
- At most one variant member can have a default member initializer.
- Unions can contain non-static data members with non-trivial special member functions.
union S {
  int a;
  float b;
  std::string str; // Before C++11, such members could not be placed directly, or static members were used.
  S() {}
  ~S() {}
}
I. Basic Usage and Scenarios
Usage of Ordinary Unions
Only one value is valid at a time.
union M {
  int a;
  double b;
  char *str;
}
Usage of Generalized Unions
The size of the union is the maximum space occupied by its data members, which changes dynamically based on the active member.
#include <iostream>
#include <string>
#include <vector>

union M {
  int a;
  int b;
  std::string str;
  std::vector<int> arr;
  M(int a) : b(a) { }
  M(const std::string &s) : str(s) { }
  M(const std::vector<int> &a) : arr(a) { }
  ~M() { } // Needs to know which data member is active to destruct correctly.
};

int main() {
  M m("123456");
  std::cout << "m.str = " << m.str<< std::endl;
  m.arr = { 1, 2, 3, 4, 5, 6 };
  std::cout << "m.arr = ";
  for(int v: m.arr) {
    std::cout << v << " ";
  }
  std::cout << std::endl;
  return 0;
}
Lifetime
A member's lifetime begins when it becomes active and ends when it becomes inactive.
#include <iostream>

struct Life {
  Life() { std::cout << "----Life(" << this << ") Start----" << std::endl; }
  ~Life() { std::cout << "----Life(" << this << ") End----" << std::endl; }
};

union M {
  int a;
  Life l;
  M(int n) : a(n) { }
  M(const Life &life) : l(life) { }
  ~M() { } // Needs to know which data member is active to destruct.
};

int main() {
  M m = 1;
  std::cout << "Life 1 time one Start" << std::endl;
  m = Life();
  // The Life object's lifetime ends before it becomes inactive here.
  std::cout << "Life 1 time one End" << std::endl;
  m = 2;
  std::cout << "Life 2 time one Start" << std::endl;
  m = Life();
  std::cout << "Life 2 time one Start" << std::endl;
  m = 3;
  return 0;
}
Anonymous Unions
int main() {
  union {
    int a;
    const char *b;
  };
  a = 1;
  b = "Jerry";
}
II. Real-World Case — Generalized Unions in the STL
std::variant Internal Storage — Recursive Generalized Union
Using the
std::variantimplementation from the vendored MSVC STL as an example (source:msvc-stl/stl/inc/variant),_CONSTEXPR20/_STDare internal macros and can be ignored while reading
// MSVC STL · msvc-stl/stl/inc/variant (abridged)
template <class _First, class... _Rest>
class _Variant_storage_<false, _First, _Rest...> {
public:
    union {
        remove_cv_t<_First> _Head;
        _Variant_storage<_Rest...> _Tail;
    };

    _CONSTEXPR20 ~_Variant_storage_() {
        // The union does not know which member is active; destruction is
        // controlled by the outer variant class
    }
    // ...
};
std::variant uses a recursive union to hold multiple types in a single block of memory. The non-trivial destructor variant must explicitly define the destructor — this is exactly the key capability of C++11 generalized unions: unions can contain members with non-trivial special member functions, but their lifecycle must be managed manually
std::any Small-Object Optimization — Union as Type-Erased Storage
std::anyuses a union to combine small-object storage, heap pointers, and raw byte buffers into the same memory (source:msvc-stl/stl/inc/any)
// MSVC STL · msvc-stl/stl/inc/any (abridged)
class any {
    struct _Storage_t {
        union {
            unsigned char _TrivialData[_Any_trivial_space_size];
            _Small_storage_t _SmallStorage;
            _Big_storage_t _BigStorage;
        };
        uintptr_t _TypeData;
    };

    union {
        _Storage_t _Storage{};
        max_align_t _Dummy;
    };
};
Summary: The core storage of both
std::variantandstd::anyrelies on generalized unions. Before C++11, unions could only hold POD types, forcing the standard library to use raw byte buffers + placement new as a workaround. Generalized unions allow code to directly express "one-of-many" memory layout, with an outer wrapper responsible for tracking the active member and managing its lifecycle, making the code easier to maintain
III. Precautions
Accessibility
Like struct, the default member access for a union is public.
Destruction of Unions
Destructors for unions are generally not defined because the union itself cannot know which member is active.
union M {
  char* str1;
  char* str2;
  ~M() {
    delete str1; // Error if the active member is str2.
  }
};
Limitations of Anonymous Unions
Anonymous unions cannot contain member functions or static data members.
union {
  int a;
  static int b; // Error: cannot have static data members.
  int print() {...}; // Error: cannot have member functions.
};
Undefined Behavior
Accessing an inactive member results in undefined behavior.
union M {
  int a;
  double b;
};

M m;
m.a = 1;
double c = m.b; // Error: undefined behavior.
IV. Exercise Code
Exercise Code Topics
- 0 - Union Default Member Initialization
- 1 - Union with Non-Trivial Types and Lifecycle Management
- 2 - Tagged Discriminated Union — A Simplified std::variant with enum + union
Exercise Auto-Checker Command
d2x checker generalized-unions
V. Other
POD (Plain Old Data)
In C, we usually call a struct that contains only simple data and can be safely copied with memcpy a POD (Plain Old Data).
In C++, there is a corresponding category of POD types whose memory layout is compatible with C and can be passed to C interfaces directly as raw binary blocks.
| Book | Video | Code | Forum |
|---|---|---|---|
| cppreference-PODType / markdown | Video Explanation | Exercise Code | Discussion Forum |
Note: since C++20, the “PODType” notion in the standard has been marked deprecated.
The standard library now prefers more fine-grained categories such asTrivialType,StandardLayoutType, andScalarTypeto describe related requirements.
Why introduce POD
- C has many structs that contain only simple data and can be copied byte-by-byte, and C++ needs to remain compatible with such usage;
- It makes it convenient to use C++ types with C libraries and system calls, passing data by raw binary layout;
- It serves as a coarse-grained type category in early standards for “low-level optimization” and “ABI compatibility”.
Relationship with other type categories
- All scalar types (
ScalarType) are POD, for example:- built-in arithmetic types:
int,double,char, etc.; - enumerations
enum; - various pointer types.
- built-in arithmetic types:
- For class types, the standard introduces:
- Trivial type (
TrivialType): all special member functions (constructors, copy/move, destructor) are trivial (compiler-generated or=default, no virtual functions involved, etc.); - Standard-layout type (
StandardLayoutType): the object layout rules are simple and predictable (e.g. single inheritance, consistent access control).
- Trivial type (
- A class is a POD class if and only if:
- it is a trivial type, and
- it is a standard-layout type.
For example:
struct A {
  int x;
  double y;
};              // POD: only built-in members, no user-defined special members

struct B {
  A a;
  int z;
};              // still POD: all members are POD types

struct C {
  virtual void foo();
  int x;
};              // not POD: has a virtual function, breaks trivial + standard-layout

struct D {
  int x;
private:
  int y;
};              // not POD: mixed public/private members, breaks standard layout
In practice, you can roughly think of a class as POD if it only contains POD members, has no user-defined special members, no virtual functions/virtual inheritance, and a simple, consistent inheritance/access pattern.
I. Basic usage and typical scenarios
Interacting with C interfaces
Use a POD struct to describe the binary layout required by a C interface so that it can be read/written as raw bytes.
struct Packet {
  std::uint32_t len;
  std::uint16_t type;
  std::uint16_t flags;
};  // typical POD struct

int main() {
  Packet p{};
  // assume fd is an opened file or socket
  read(fd, &p, sizeof(p));
  write(fd, &p, sizeof(p));
}
Simple memory snapshots
A POD type can be treated as a “byte array” for copying, which is usually safe on the same platform and with the same ABI/compile settings.
struct Point {
  float x;
  float y;
};  // POD

void copy_points(const Point* src, Point* dst, std::size_t n) {
  std::memcpy(dst, src, n * sizeof(Point));  // byte-wise copy
}
Working with type traits
Older code often uses
std::is_podto constrain template parameters; modern C++ prefers more fine-grained traits.
template <typename T>
void pod_only_copy(const T& src, T& dst) {
  static_assert(std::is_pod<T>::value, "T must be POD");
  std::memcpy(&dst, &src, sizeof(T));
}
In new code, it is better to express constraints based on actual needs, for example:
std::is_trivially_copyable<T>(trivially copyable)std::is_standard_layout<T>(standard layout)std::is_scalar<T>(scalar type)
II. Notes
POD does not guarantee cross-platform / cross-build binary compatibility
- Different platforms, compilers, or compile options may result in different alignment and padding;
- If you persist raw POD bytes (e.g. files or network) and then
reinterpret_castthem in another environment, differences in endianness, alignment, etc. can easily cause issues.
The POD notion is deprecated in C++20
- Since C++20, the standard marks “PODType” as deprecated;
- When adding or updating interfaces, prefer explicit, precise checks instead:
std::is_trivial<T>/std::is_trivially_copyable<T>std::is_standard_layout<T>std::is_scalar<T>
Over‑focusing on “everything must be POD” hurts design flexibility
- Many modern C++ types (
std::string,std::vector, etc.) are not POD, but provide safer and more expressive abstractions; - Usually only low-level modules that interact with C, perform binary serialization, or operate on raw memory need POD-like constraints; other code should favor modern C++ abstractions and safety features.
III. Exercise code
Exercise topics
- 0 – Use type traits to check POD / trivial / standard-layout
- 1 – Simulate byte-wise copying of a POD struct and observe the behavior
- 2 – Adapt C++ message types to C interface using POD headers
Auto-check command
d2x checker pod-type
IV. Other resources
Generic Lambdas
C++14 allows lambda parameters to use auto, turning the lambda's operator() into an implicit function template — a single lambda can accept arguments of different types
| Book | Video | Code | X |
|---|---|---|---|
| cppreference-lambda / markdown | Video Explanation | Exercise Code |
Why introduced?
- In C++11, lambda parameter types must be explicitly specified — the same lambda cannot be reused for different argument types because
operator()is a plain member function, not a template - Many lambdas express type-independent logic (e.g. comparing two values), but C++11 required writing separate lambdas for each concrete type (e.g.
[](int a, int b) { return a < b; }for int,[](double a, double b) { return a < b; }for double) - C++14 allows
autoin lambda parameters; the compiler generates an implicit template foroperator(), essentially bringing function templates into the lambda world
How does it work?
The compiler expands a generic lambda into a functor class with a templated operator(). For example, [](auto a, auto b) { return a + b; } is internally equivalent to:
struct __lambda {
    template <typename T1, typename T2>
    auto operator()(T1 a, T2 b) const {
        return a + b;
    }
};
I. Basic Usage and Scenarios
Simple Generic Lambda
Declare lambda parameters with auto; the compiler generates operator() instances based on the argument types at the call site
auto identity = [](auto x) {
    return x;
};

int    i = identity(42);       // x deduced as int
double d = identity(3.14);     // x deduced as double
Multi-Parameter Generic Lambda
auto add = [](auto a, auto b) {
    return a + b;
};

add(1, 2);           // int + int
add(1.5, 2.5);       // double + double
add(std::string("hello "), std::string("world")); // string + string
Each parameter's type is deduced independently; T1 and T2 can differ:
auto multiply = [](auto a, auto b) {
    return a * b;
};

multiply(2, 3.5);    // int * double → double
Generic Lambda + STL Algorithms
The most common use case — avoid writing identical logic for every container element type:
std::vector<int> v1 = {5, 1, 4, 2, 8};
std::vector<double> v2 = {3.1, 2.7, 8.5, 1.9};

// C++11: write separate lambdas for int and double
std::sort(v1.begin(), v1.end(), [](int a, int b) { return a > b; });
std::sort(v2.begin(), v2.end(), [](double a, double b) { return a > b; });

// C++14: a single generic lambda handles both
auto gt = [](auto a, auto b) { return a > b; };
std::sort(v1.begin(), v1.end(), gt);
std::sort(v2.begin(), v2.end(), gt);
Generic Lambda with Captures
Captured variables keep their concrete types; only parameters use auto:
int threshold = 10;
auto above = [threshold](auto x) {
    return x > threshold;  // threshold is int, x is generic
};

above(20);   // x = int
above(3.5);  // x = double
Generic Lambda Returning Lambda
A generic lambda can return a new lambda, creating a function factory:
auto make_adder = [](auto n) {
    return [n](auto x) { return x + n; };  // C++14 supports this
};

auto add5 = make_adder(5);
add5(10);   // 15
add5(3.14); // 8.14
II. Real-World Case — Transparent Functors and Generic Lambdas in the STL
C++14 introduced transparent operator functors (e.g.
std::less<>/std::greater<>) alongside generic lambdas — both motivated by the same goal: eliminating the need to hard-code concrete types. The examples below cite the vendored MSVC STL (source:msvc-stl/stl/inc/xutility);_NODISCARD/constexprare internal annotations and can be ignored while reading
std::greater Transparent Specialization — A Comparator That "Sees" Any Type
In C++11, std::greater<T> locked in the template parameter T — std::greater<int> could only compare int. C++14 added std::greater<> (equivalent to std::greater<void>), where operator() is itself a template accepting any comparable types:
// MSVC STL · msvc-stl/stl/inc/xutility (abridged)
template <>
struct greater<void> {
    template <class _Ty1, class _Ty2>
    _NODISCARD constexpr auto operator()(_Ty1&& _Left, _Ty2&& _Right) const
        noexcept(...) -> decltype(static_cast<_Ty1&&>(_Left) > static_cast<_Ty2&&>(_Right)) {
        return static_cast<_Ty1&&>(_Left) > static_cast<_Ty2&&>(_Right);
    }

    using is_transparent = int;
};
The operator() is a template member function — exactly the same underlying mechanism as a generic lambda. The is_transparent tag signals to associative containers like std::set and std::map that this comparator supports heterogeneous lookup, allowing a std::string to be used to search a std::set<std::string> without constructing a temporary object
Transparent Comparators and Generic Lambdas — Two Sides of the Same Coin
Transparent functors and generic lambdas are interchangeable for the same use case:
std::vector<int> v = {5, 1, 4, 2, 8};

// option 1: C++14 transparent comparator
std::sort(v.begin(), v.end(), std::greater<>());

// option 2: C++14 generic lambda
std::sort(v.begin(), v.end(), [](auto a, auto b) { return a > b; });
Both eliminate the C++11 redundancy of writing separate comparators for int, double, string, etc.
Summary: C++14's transparent functors and generic lambdas are two expressions of the same idea — "parameterize the argument types". Transparent functors apply it to callable objects; generic lambdas apply it to lambdas. Understanding how the
is_transparenttag connects both to STL algorithms shows why the standard library introduced these two features together in C++14
III. Notes
A Generic Lambda Is a Class with a Templated operator()
Each generic lambda expression produces a distinct closure type. Even two identical-looking generic lambdas have different types — the same rule as regular lambdas, but the operator() is a template, so the same type can accept different argument types
auto f = [](auto x) { return x; };
auto g = [](auto x) { return x; };
// f and g have different types; cannot be assigned to each other
Generic Parameters and Perfect Forwarding
Generic lambda parameter deduction strips references and const by default. Use auto&& with std::forward to preserve them:
auto forwarder = [](auto&& x) -> decltype(auto) {
    return std::forward<decltype(x)>(x);
};
This pattern is common with generic lambdas and is a typical use case for decltype(auto) (another C++14 feature)
Generic Lambdas Can Be Variadic
C++14 generic lambdas support parameter packs — [](auto... xs) accepts any number (and types) of arguments. The compiler generates a templated operator() with a parameter pack. C++20 later added explicit template parameter lists for lambdas ([]<typename... Ts>(Ts... xs)), but variadic generic lambdas were already usable in C++14
IV. Exercise Code
Exercise Code Topics
- 0 - Basic Generic Lambda — auto parameters and type deduction
- 1 - Generic Lambda with STL Algorithms — sort, find, factory function
Exercise Auto-Checker Command
Don't have d2x? Click for setup
# 1. Install xlings (Linux / macOS)
curl -fsSL https://raw.githubusercontent.com/openxlings/xlings/main/tools/other/quick_install.sh | bash
# Windows PowerShell:
# irm https://raw.githubusercontent.com/openxlings/xlings/main/tools/other/quick_install.ps1 | iex

# 2. Install d2x and get the tutorial
xlings install d2x -y
d2x install d2mcpp

# 3. Enter the project directory & run the checker
cd d2mcpp
d2x checker generic-lambdas
V. Other
d2mcpp Changelog
2025/11
C++11 - 13 - long long - 64-bit Integer Type
C++11 - 12 - nullptr - Pointer Literal
2025/09
C++11 - 11 - Inherited Constructors
2025/08
C++11 - 11 - Inherited Constructors
C++11 - 10 - Delegating Constructors
Practice Detection Command
d2x checker delegating-constructors
Frequently Asked Questions
More questions and feedback -> Tutorial Forum Discussion Section